
Register an application
Registering your application establishes a trust relationship between your app and the Microsoft identity platform. The trust is unidirectional: your app trusts the Microsoft identity platform, and not the other way around.
Follow these steps to create the app registration:
-
Sign in to the Azure portal.
-
If you have access to multiple tenants, use the Directories + subscriptions filter in the top menu to switch to the tenant in which you want to register the application.
-
Search for and select Azure Active Directory.
-
Under Manage, select App registrations > New registration.
-
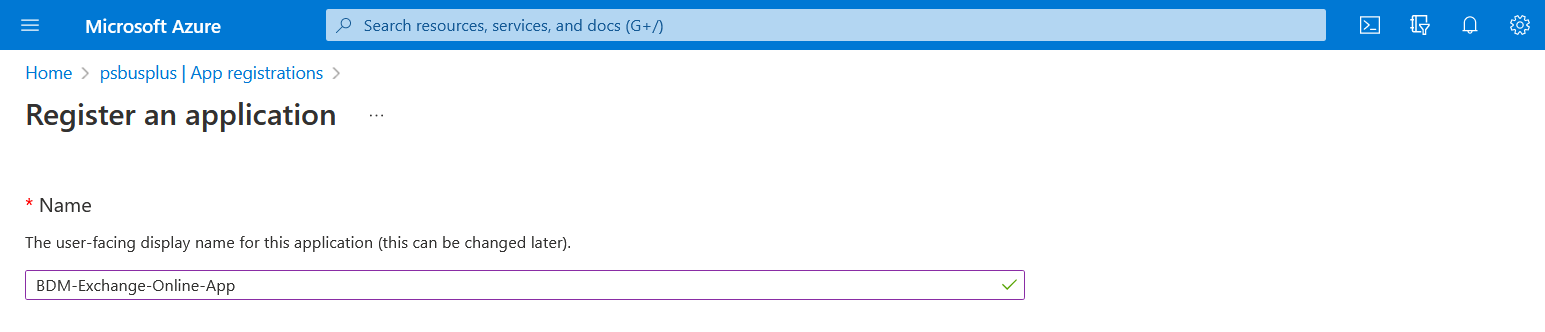
Enter a display Name for your application. Users of your application might see the display name when they use the app, for example during sign-in. You can change the display name at any time and multiple app registrations can share the same name. The app registration's automatically generated Application (client) ID, not its display name, uniquely identifies your app within the identity platform.
-
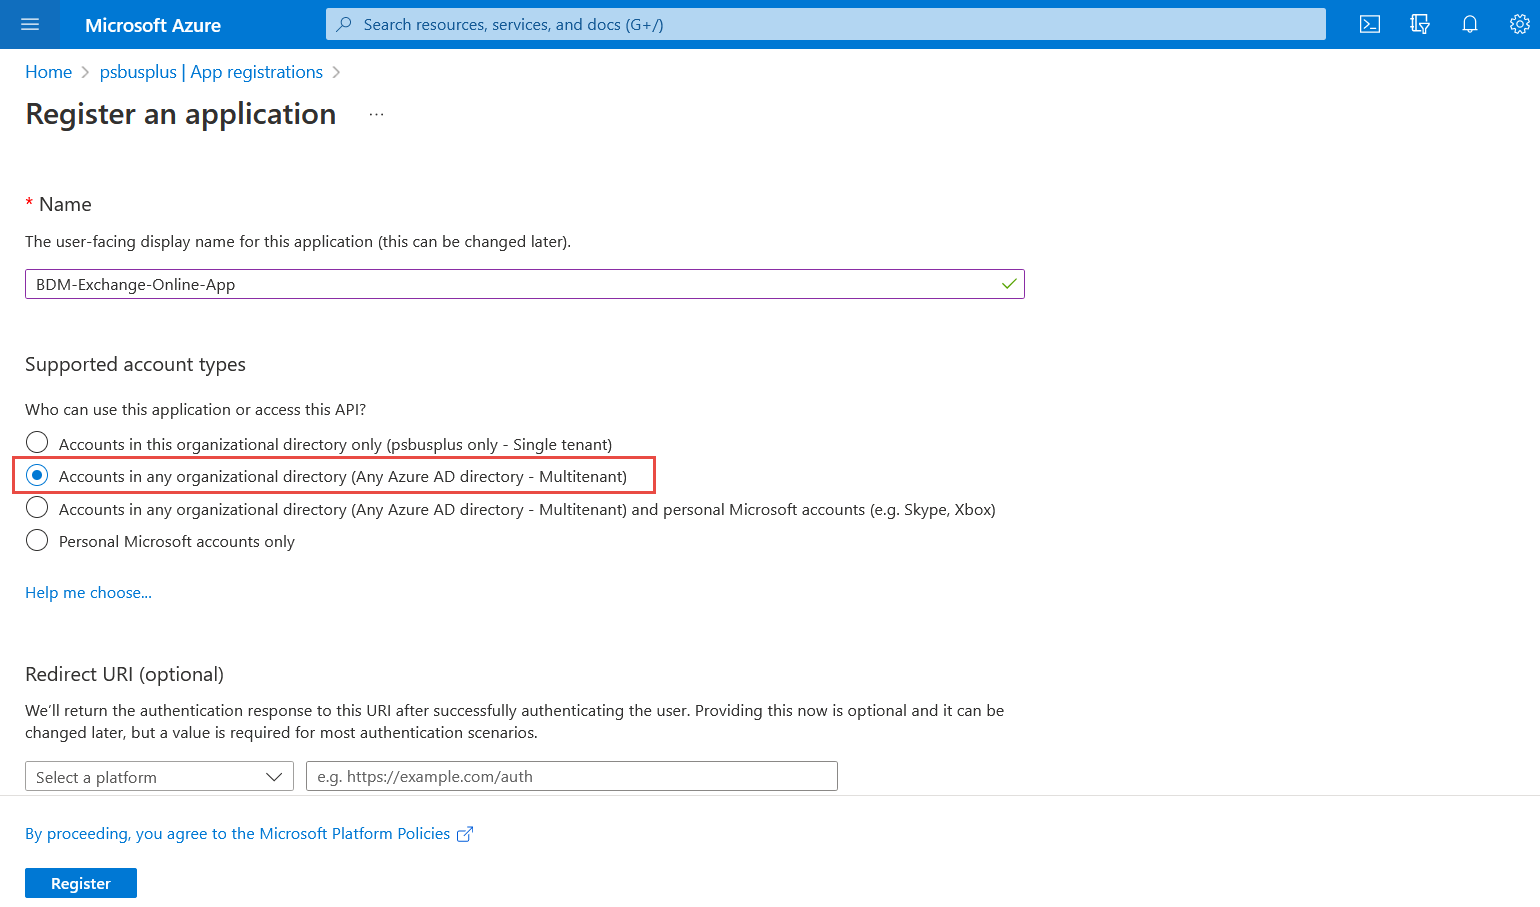
Specify who can use the application, sometimes called its sign-in audience.
|
Supported account types |
Description |
|---|---|
|
Accounts in this organizational directory only |
Select this option if you're building an application for use only by users (or guests) in your tenant. Often called a line-of-business (LOB) application, this app is a single-tenant application in the Microsoft identity platform. |
|
Accounts in any organizational directory |
Select this option if you want users in any Azure Active Directory (Azure AD) tenant to be able to use your application. This option is appropriate if, for example, you're building a software-as-a-service (SaaS) application that you intend to provide to multiple organizations. This type of app is known as a multitenant application in the Microsoft identity platform. |
|
Accounts in any organizational directory and personal Microsoft accounts |
Select this option to target the widest set of customers. By selecting this option, you're registering a multitenant application that can also support users who have personal Microsoft accounts. |
|
Personal Microsoft accounts |
Select this option if you're building an application only for users who have personal Microsoft accounts. Personal Microsoft accounts include Skype, Xbox, Live, and Hotmail accounts. |
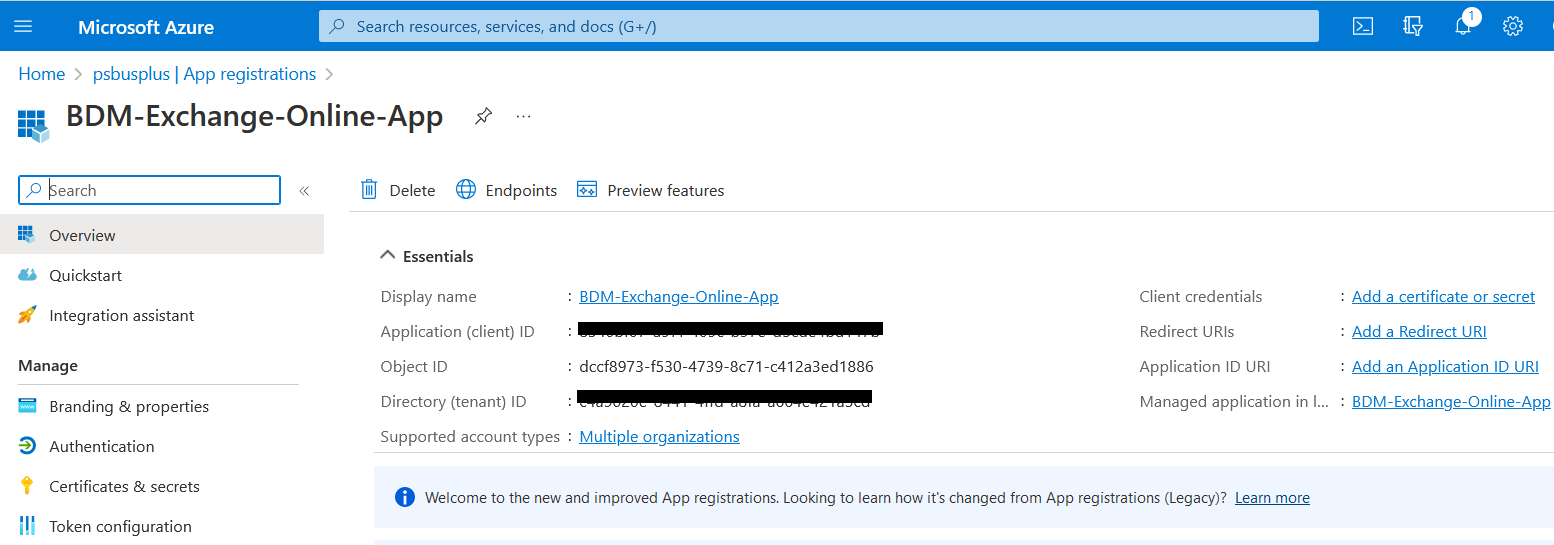
7. Don't enter anything for Redirect URI (optional). You'll configure a redirect URI in the next section. When registration finishes, the Azure portal displays the app registration's Overview pane. You see the Application (client) ID. Also called the client ID, this value uniquely identifies your application in the Microsoft identity platform.
Your application's code, or more typically an authentication library used in your application, also uses the client ID. The ID is used as part of validating the security tokens it receives from the identity platform.
Configure Platform Settings
Settings for each application type, including redirect URIs, are configured in Platform configurations in the Azure portal. Some platforms, like Web and Single-page applications, require you to manually specify a redirect URI. For other platforms, like mobile and desktop, you can select from redirect URIs generated for you when you configure their other settings.
To configure application settings based on the platform or device you're targeting, follow these steps:
-
-
In the Azure portal, in App registrations, select your application.
-
Under Manage, select Authentication.
-
Under Platform configurations, select Add a platform.
-
Under Configure platforms, select the tile for your application type (platform) to configure its settings.

-
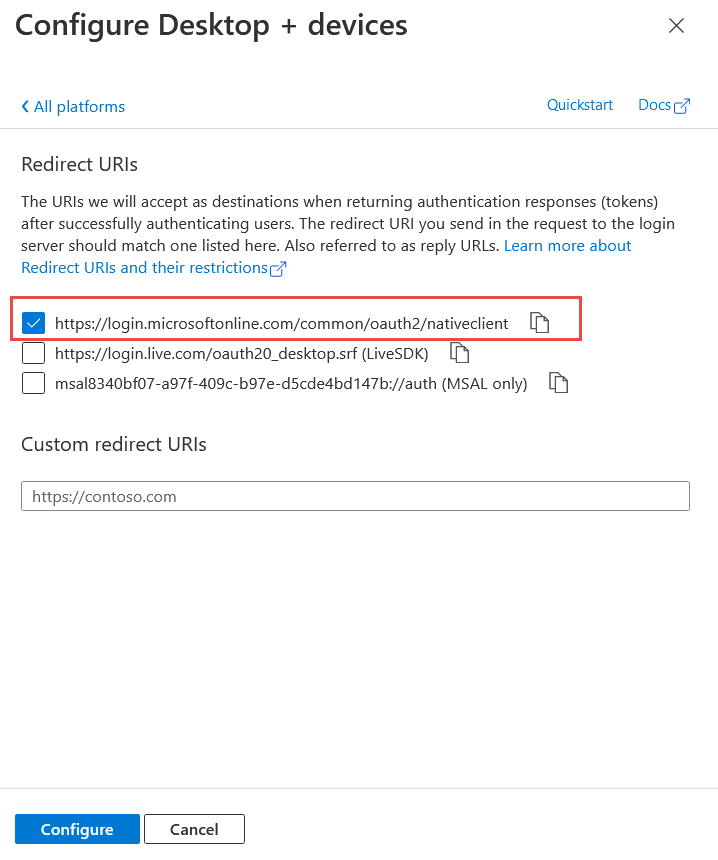
Select the Mobile and desktop applications Platform and add Redirect Uri select https://login.microsoftonline.com/common/oauth2/nativeclient
-
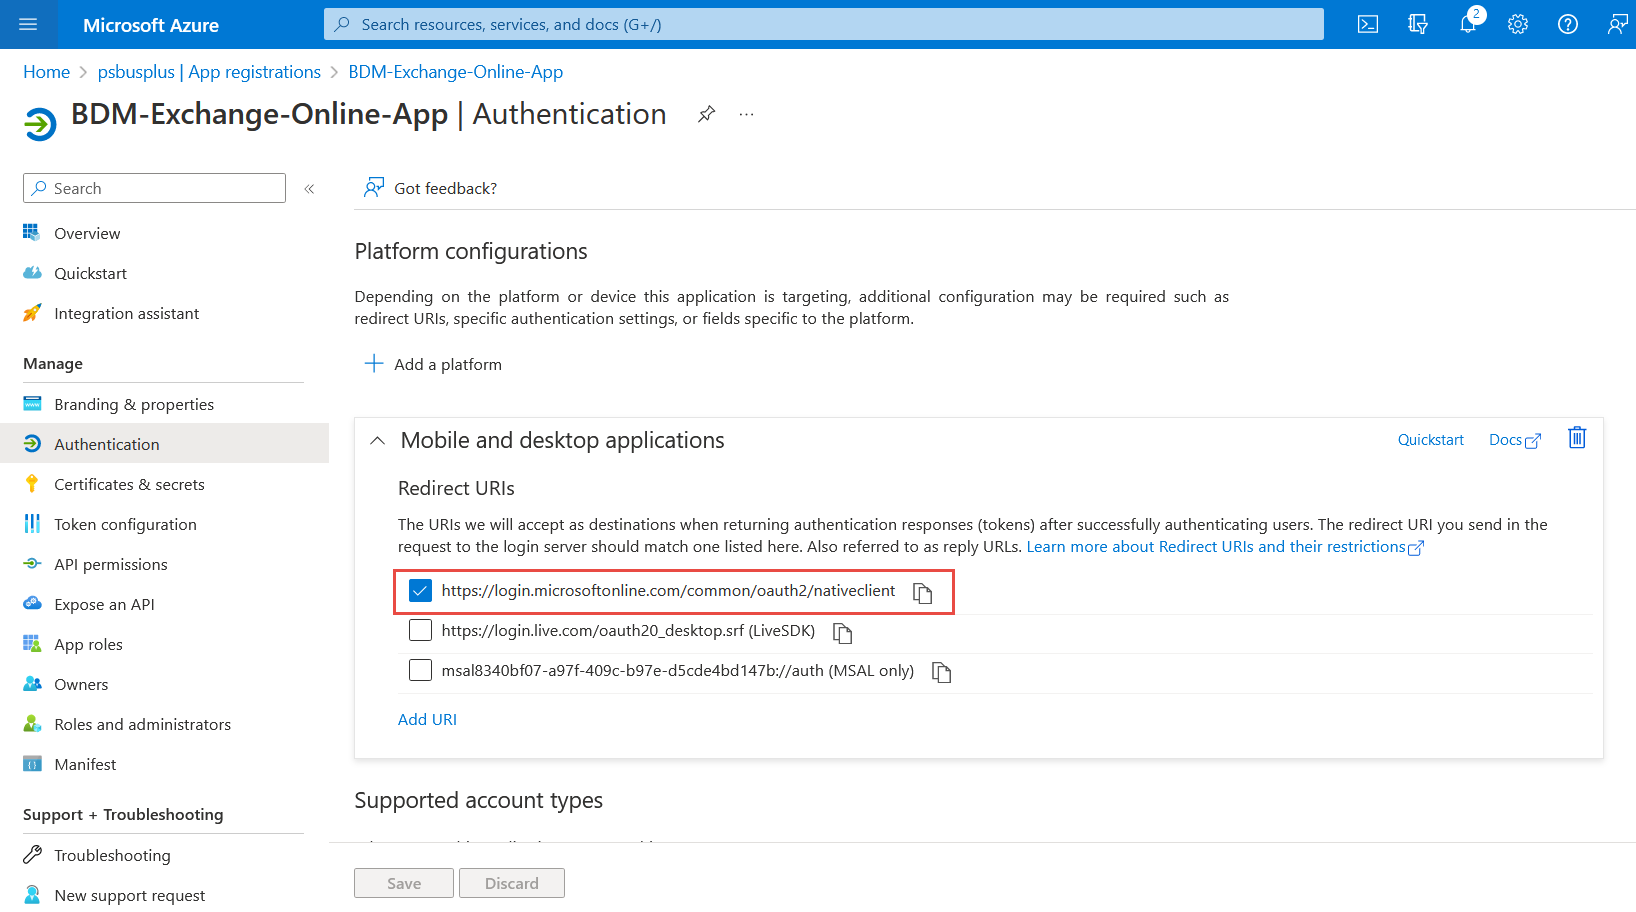
6. Enable the following mobile and desktop flows

Add Credentials
Credentials are used by confidential client applications that access a web API. Examples of confidential clients are web apps, other web APIs, or service-type and daemon-type applications. Credentials allow your application to authenticate as itself, requiring no interaction from a user at runtime.
You can add both certificates and client secrets (a string) as credentials to your confidential client app registration.
Add a Certificate
Sometimes called a public key, a certificate is the recommended credential type because they're considered more secure than client secrets. For more information about using a certificate as an authentication method in your application, see Microsoft identity platform application authentication certificate credentials.
-
-
In the Azure portal, in App registrations, select your application.
-
Select Certificates & secrets > Certificates > Upload certificate.
-
Select the file you want to upload. It must be one of the following file types: .cer, .pem, .crt.
-
Select Add.
-
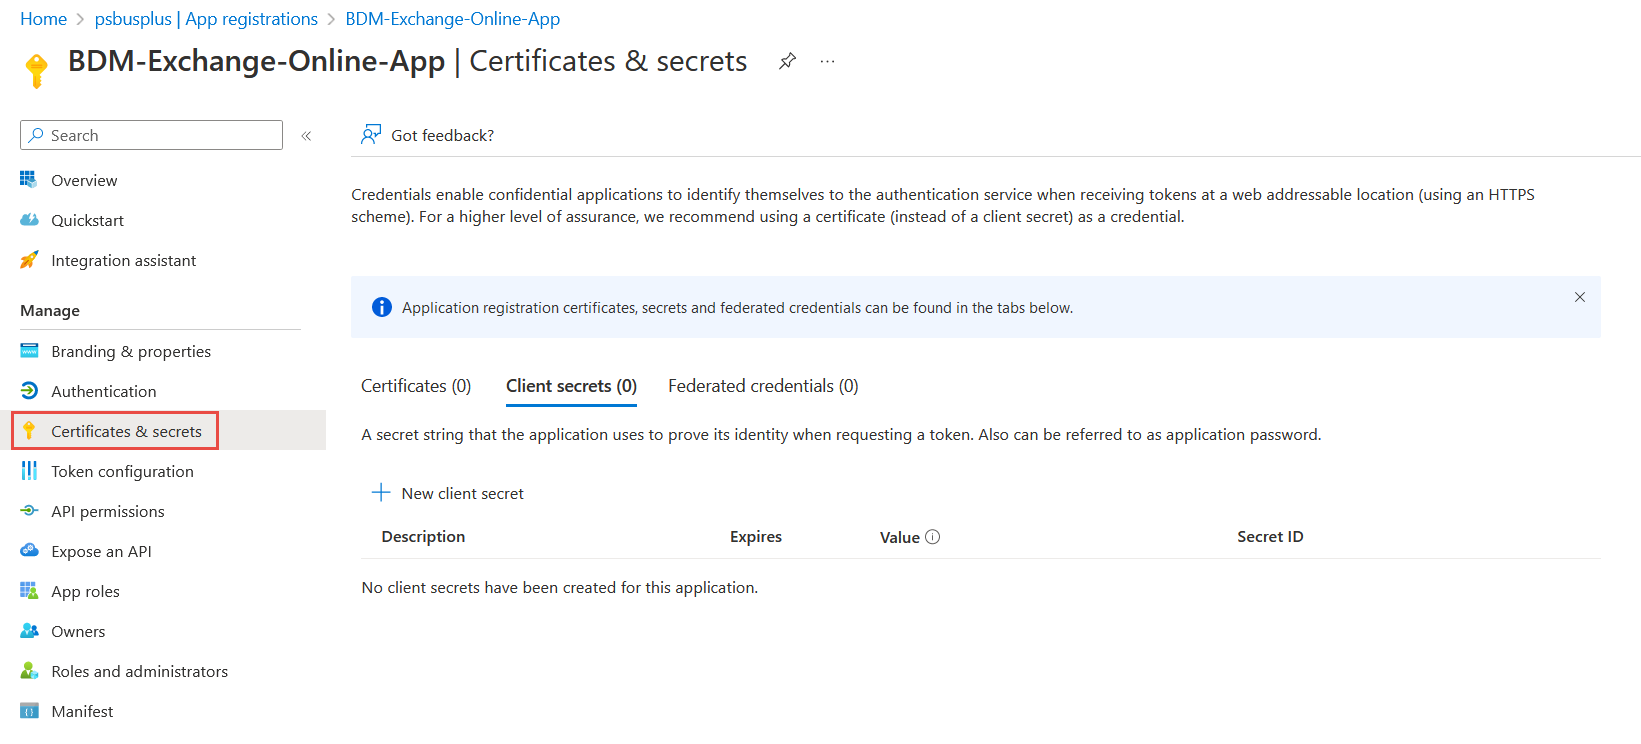
Add a Client Secret
Sometimes called an application password, a client secret is a string value your app can use in place of a certificate to identity itself.
Client secrets are considered less secure than certificate credentials. Application developers sometimes use client secrets during local app development because of their ease of use. However, you should use certificate credentials for any of your applications that are running in production.
-
-
In the Azure portal, in App registrations, select your application.
-
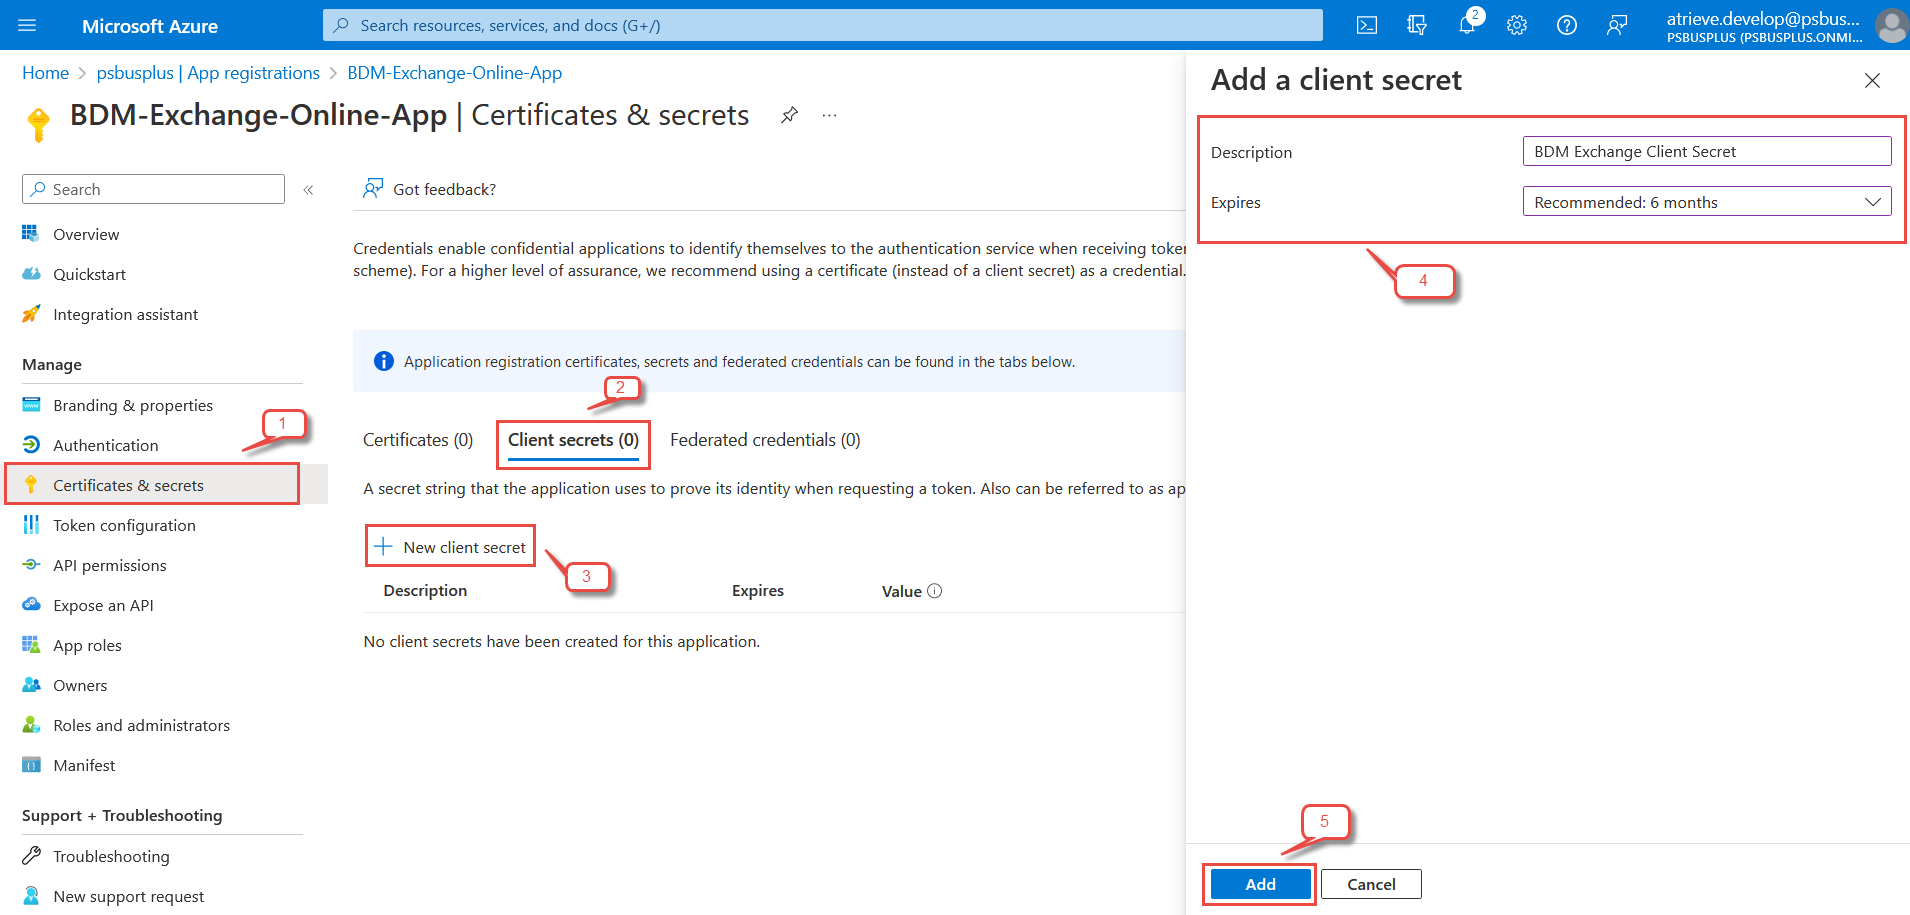
Select Certificates & secrets > Client secrets > New client secret.
-
Add a description for your client secret.
-
Select an expiration for the secret or specify a custom lifetime.
-
Client secret lifetime is limited to two years (24 months) or less. You can't specify a custom lifetime longer than 24 months.
-
Microsoft recommends that you set an expiration value of less than 6 months.
-
-
-
-
Select Add.
-
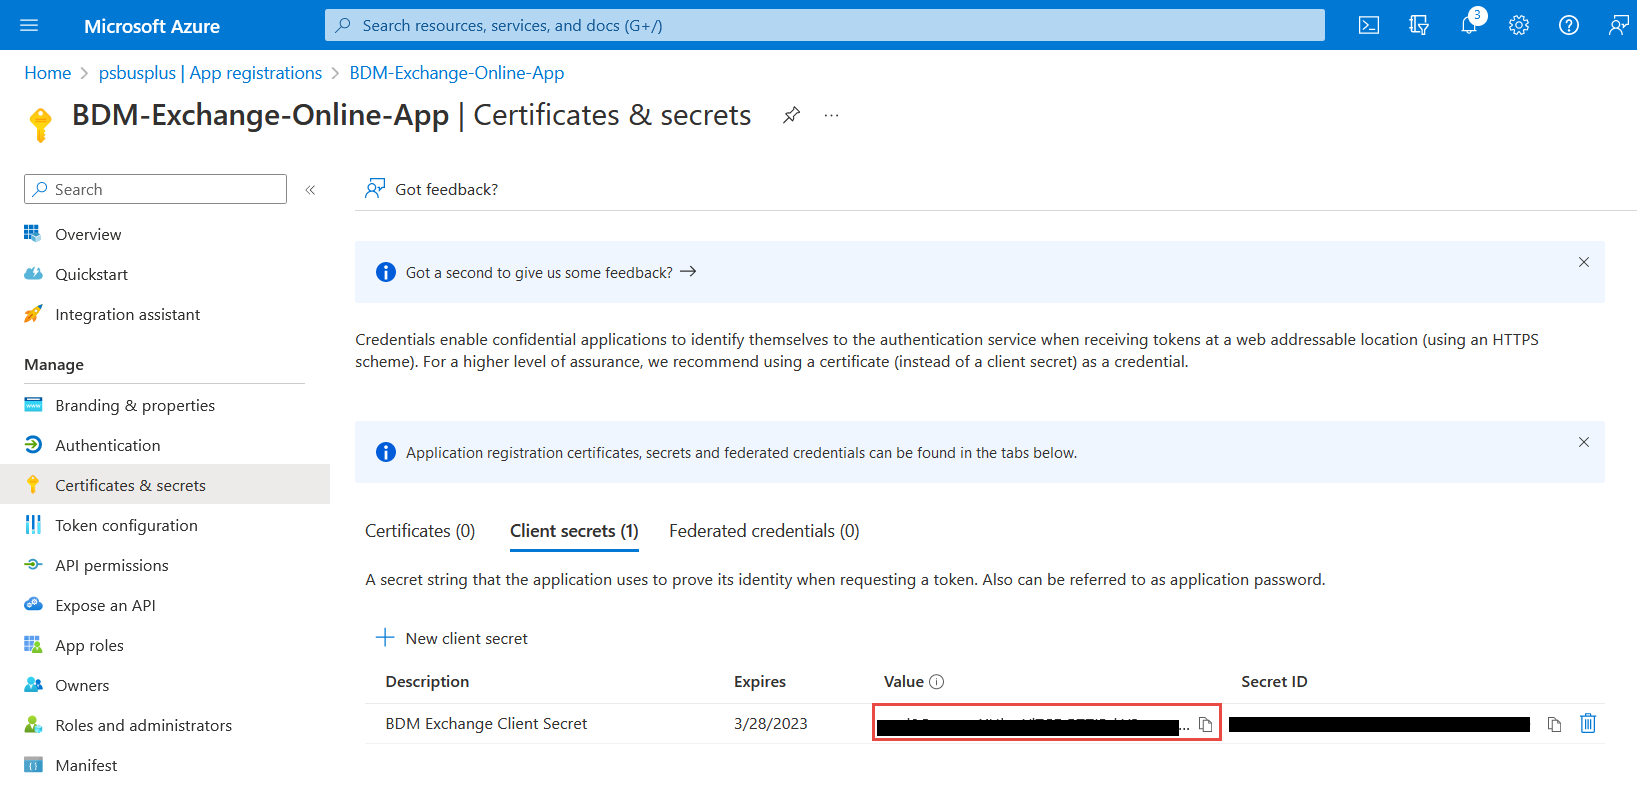
Record the secret's value for use in your client application code. This secret value is never displayed again after you leave this page.
-
Authenticate an IMAP, POP or SMTP connection using OAuth
-
-
Select API permissions > Add a permission > Microsoft Graph
-
Select Delegated permissions. Microsoft Graph exposes many permissions, with the most commonly used shown at the top of the list.
-
Under Select permissions, select the following permissions:
-
|
Permission |
Description |
|---|---|
|
|
View users' email address |
|
offline_access |
Maintain access to data you have given it access to |
|
openid |
Sign users in |
|
User.Read |
Sign in and read user profile |
|
IMAP.AccessAsUser.All |
Read and write access to mailboxes via IMAP. |
|
POP.AccessAsUser.All |
Read and write access to mailboxes via POP. |
|
SMTP.Send |
Send emails from mailboxes using SMTP AUTH. |
4. Select Add permissions to complete the process.
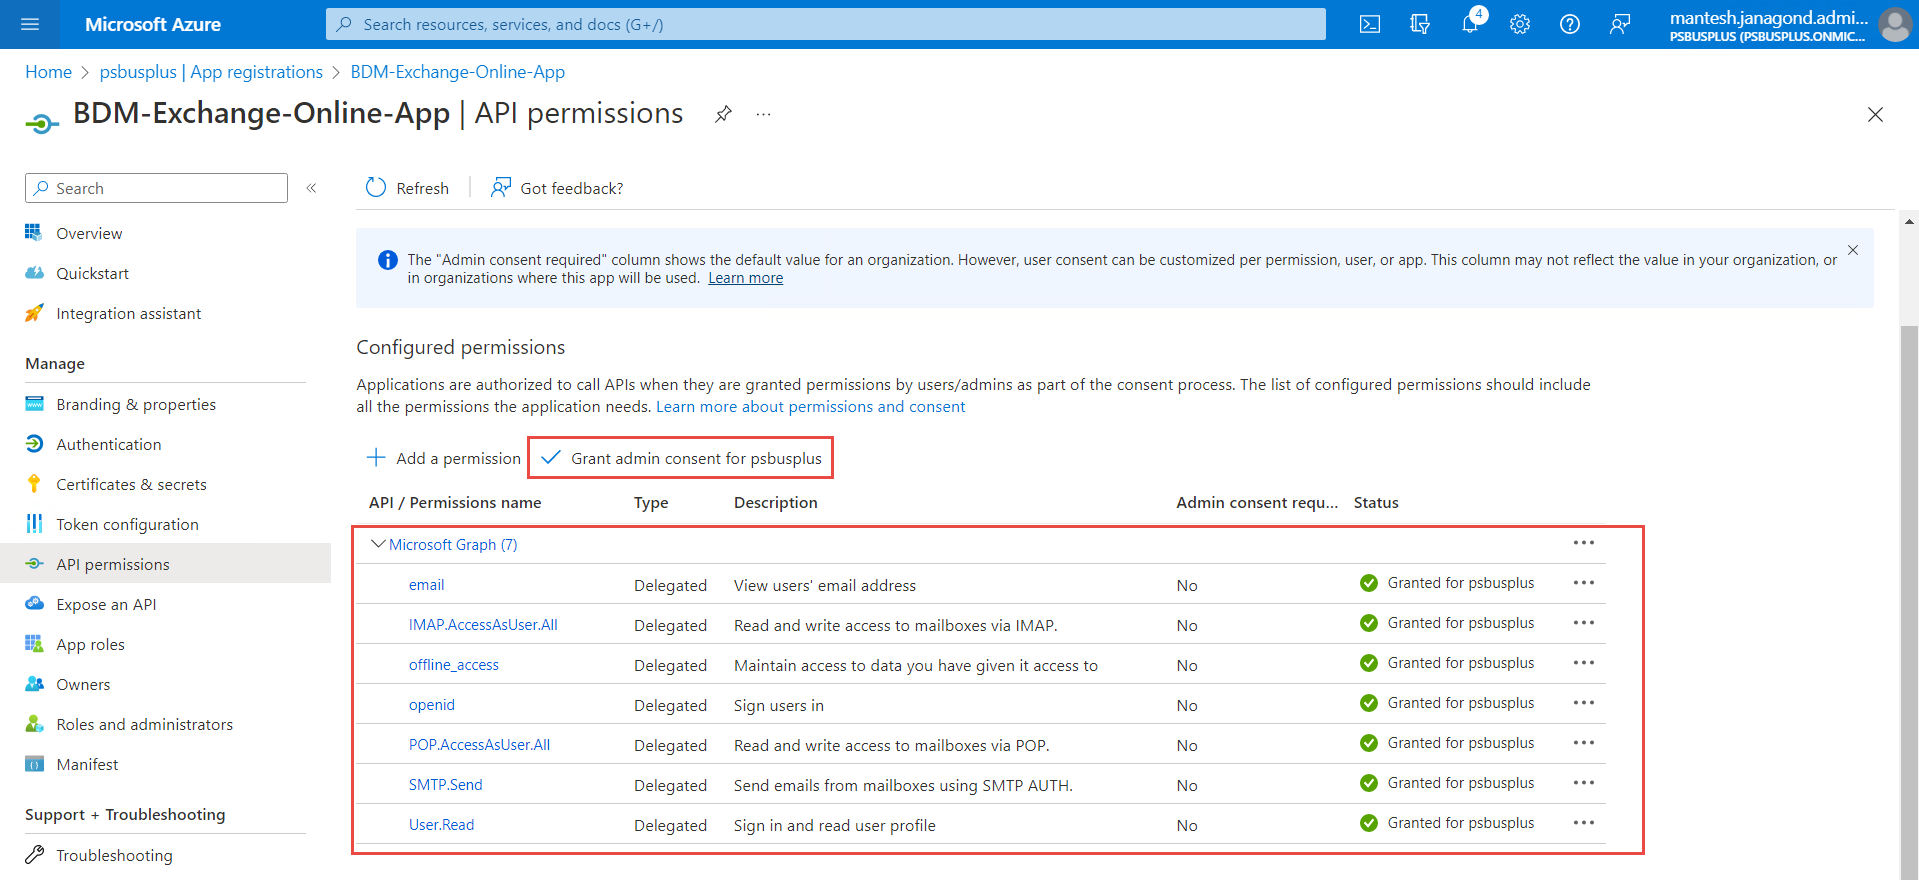
5. Some permissions, like Microsoft Graph's permission, require admin consent. You grant admin consent by selecting the Grant admin consent button.
Configuring the BDM application to use oAuth
Contact PowerSchool Support at help.powerschool.com to schedule the reconfiguration of Bulk Document Management from Basic authentication to oAuth authentication.