
The new Menu Builder is located under the Tools menu and Security and Setup. On the Roles page, you will see a listing of the Roles defined by your district. From this page you may view, add, edit and remove Roles.
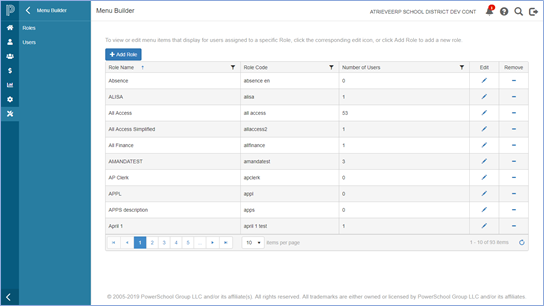
The Roles in Menu Builder define the menu items that will display for users assigned to that role when they sign into the system. For consistency, you would use the same Role name across applications.
Note that the signed in User will still require the appropriate permissions to be able to access the programs associated to the menu items. If the User clicks on a menu item where they do not have permission to access the application, a warning message will display.
To add a new role click Add Role and enter the Role and Role Code. For the Role code you may enter a new code, by typing a value into the text field, or select an existing code from the list.
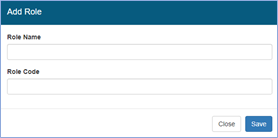
Note that existing codes are pulled from the Role Code database in atrieveHR. Best practice would be that you add the Role to the Role Code database in atrieveHR first which populates the Role Code in Menu Builder which saves you from having to add it to both places manually. If you add a Role Code in Menu Builder first, it does not automatically update the Role Code database.
To remove a Role from Menu Builder, click on the corresponding Remove icon. If there are Users assigned to the Role that you are attempting to remove you will be prevented from removing it. To remove the Role, you will need to reassign any Users assigned to that role to another role first. Or, if those users do not require a Menu Override you would simply remove the users from the role, and the menu for those Users will be built based on their logged in security Role.
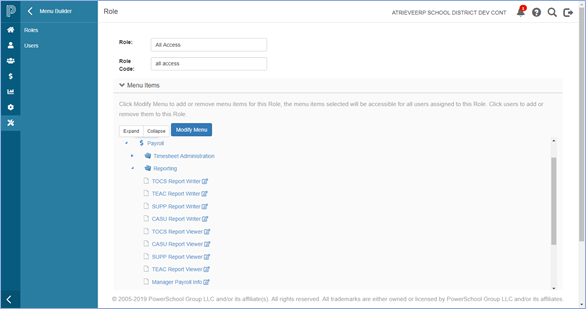
To edit an existing Role, click on the Edit pencil. On the Edit Role page, you will see a listing of the menus and menu items associated to that Role, as well as the Users assigned to the Role. If required, you may update the Role name and select a different Role Code to associate to the Role (if applicable) on this page. Changing the associated Role Code should only be done with caution.
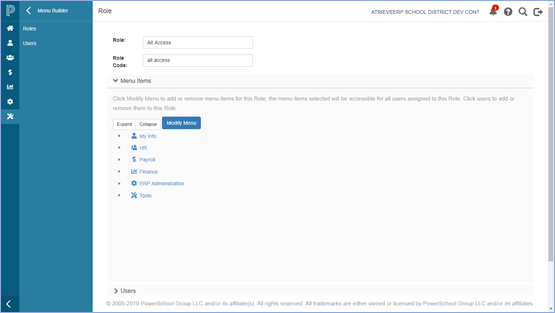
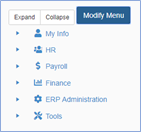
In the Menu Items section of the page you will see a menu tree which is dynamically built based on the menu items selected for the Role.
By default, when a Role is first created the menu tree will not display. To add menu items, click Modify Menu and the menu item popup window will display.
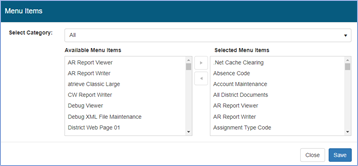
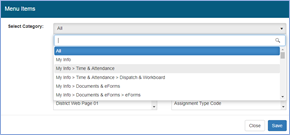
If you are not sure under which menu the menu item resides then you may search All Available Menu Items. But if you know the menu where the menu item resides then you can select it from the menu dropdown to refine your search.
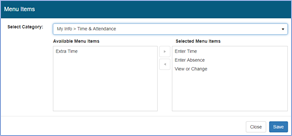
Once you have located the menu item, click on it and then click the right arrow button to move to the selected list. To deselect an item, click to highlight it and then click the left arrow button to move it back to the Available list.
Click save, and the menu item tree is updated. By default, the menu tree is collapsed; you can expand each menu by clicking the arrow head next to the menu, or to expand all, click the Expand button. To collapse the entire tree, click the Collapse button.
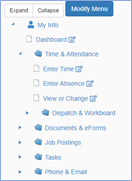
Next to each menu item there is an Edit icon that allows you to view the associated environment. DO NOT make changes to the environment for a menu item without consulting an atrieveERP specialist.
AtrieveERP has 7 core system environments, including:
-
Finance
-
Human Resources
-
Payroll
-
Employee Self Serve
-
Global
-
Miscellaneous Account Receivable
-
Automated Dispatch
Generally, these are the only environments that your district will need, and our menu items are configured for those environments. In some cases, your district may require additional environments, for example to support different payroll configurations for reporting (Teacher Pay reporting, Support Pay reporting, etc.). Additional environments can be configured by your atrieveERP specialists; for more information please enter a request through support.
Menu item names are standardized and cannot in general be modified, but there are some menu items that do allow for customization of the menu item name, including but not limited to custom eForms, Report Writers and Viewers, where additional environments are used and some menu items under Job Postings. For a detailed listing of all menu items that are customizable refer to the Appendix in this document.
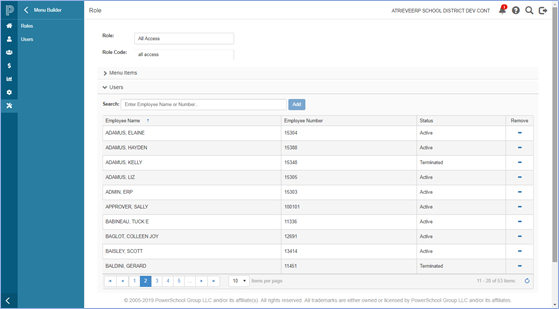
To add or remove Users associated to a Role click on the Users section below the Menu Item tree. From here you can type the name of the user to add to the Role. Or to remove a user from a menu override Role click the remove icon.
Note that the employee search list contains ONLY those users with Menu Overrides. Users without overrides will have their menu built by the system, based on the Role Code assigned to that user during the login process to the web portal.
Selecting the Users menu item from the left navigation menu provides you with a quick way to view the roles and menu items associated to a particular User.
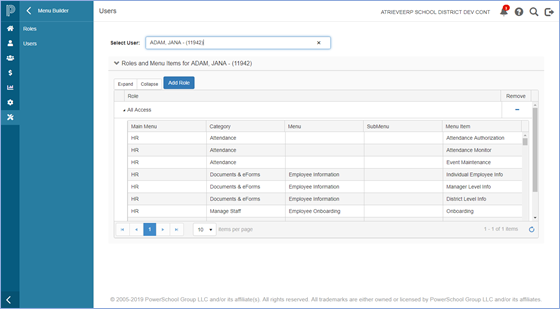
A user may be assigned more than one Role if applicable in Menu Builder. When the user signs into the system the menu will display a consolidated listing of the menu items that they have access to, based on their Role or Roles.
You may remove menu override roles associated to a user, and all associated menu items will no longer be accessible to that user when they sign in.