
This is for on-premise Active Directory integration to Atrieve. These instructions are not to integrate Azure AD with Atrieve.
To minimize the User ID/Password maintenance overhead for your users and administrators we have developed the LDAP plugin which allows the Atrieve web portal to authenticate users against your Windows Active Directory. Users may then log into the Atrieve web portal using their existing network credentials instead of a separate user name and password.
Network administrators gain improved control since it becomes possible to lock users out of the web portal by simply disabling their accounts in Active Directory.
Prerequisites
-
The LDAP plugin must pass username and password information across the internet. As such, the only acceptable method of communication must be encrypted. We support just one such method: LDAPS, or LDAP over Secure Socket Layer.
-
The primary purpose of the SSL certificate on your active directory server is to provide proof to our hosted server that your server really is your server. It is therefore a matter of what our server requires to trust your server. We prove our web server’s identity to you by providing the correct username and password from a specific IP address. Your server proves its identity to us by providing us a certificate meeting our
-
Because a hosted environment is a shared environment, the security of a hosted solution is only as strong as its weakest authentication. It is therefore essential that we adopt universal standards for all hosted clients and require all to
-
We do not accept self-signed certificates nor certificates issued by districts that are their own certificate authority. The only accepted SSL certificates are ones issued by major, commercially trusted root certificate authorities. Commercial certificates are inexpensive, easy to obtain, install and manage.
-
Districts who do not provide a commercially issued SSL certificate or comply with the requirements of this document will be set up with database authentication instead so that district usernames and passwords are never sent over the internet unencrypted. For greater clarity – districts that cannot comply with our SSL certificate requirements not be permitted to integrate their Windows Active Directory with the hosted
Recommendation
We recommend using a read-only domain controller. For more information see: https://technet.microsoft.com/en-us/library/cc771744(v=ws.10).aspx. Although this is not required, it would be considered a best practice to ensure 3rd party applications cannot make changes to your Active Directory.
Active Directory Configuration Requirements
-
A PowerSchool account needs to be created on your Active Directory with the following characteristics;
-
The account is at the top level of the directory structure and able to browse all of the users that will be logging in.
-
It has READ-ONLY access, no other level of access is required.
-
It needs to have an employee number of 99999 (see below regarding employee IDs)
-
-
Each employee that will require Web portal access must have an active directory account
-
Within the active directory account, the PowerSchool employee ID (generated from HR) must exist in a confidential field on the active directory account. If the employeeNumber field (which is confidential) in Active Directory is already being utilized for another purpose an alternate field may be used, however, it must be a field that is confidential. For more information on Active Directory confidentiality please see http://windowsitpro.com/active-directory/using- confidentiality-bit-hide-data-active- directory
-
-
PowerSchool will provide a list of employee ID’s from the HR system to be entered in Active Directory
-
The Client must provide PowerSchool technical staff with the following information
-
-
LDAP or AD access fully qualified domain name, ie., secure.yourdistrict.com and IP address if this domain is not in public This domain name MUST match the Subject Alternative Name (SAN) on the certificate.
-
The full distinguished name of the PowerSchool account (distinguishedName attribute).
-
PowerSchool account login credentials
-
Security link field (normally it is the employeeNumber attribute).
-
EXAMPLE:
-
-
LDAP Server: yourdistrict.com
-
LDAP Security.Principal: CN=psldap, OU=Users, OU=Staff, DC=ab,DC=c (distinguishedName attribute)
-
LDAP Security Credentials: password for psldap account
-
LDAP attribute security Link: employeeNumber (or field of choice)
-
Note
Per bullet D in the example above, the field that contains the atrieveHR employee ID can be any Active Directory Account field that is confidential. If an alternate field is used please ensure PowerSchool technical contact is advised.
Certificate Requirements for LDAPS
-
Certificate must be valid for the purpose of Server Authentication. This means that it must also contains the Server Authentication object identifier (OID): 3.6.1.5.5.7.3.1
-
The Subject name or the first name in the Subject Alternative Name (SAN) must match the Fully Qualified Domain Name (FQDN) of the host machine, such as Subject:CN=server1.contoso.com.
-
The host machine account (your LDAP server) must have access to the private key. (Source: https://social.technet.microsoft.com/wiki/contents/articles/2980.ldap-over-ssl-ldaps- aspx)
LDAPS Configuration Requirements
-
If you do not have a public DNS entry for your (RODC or) LDAP server’s external IP address, provide it to your installer so they can create a hosts file
-
Obtain a commercial SSL certificate from a well-known trusted authority and ensure it meets the requirements listed above. Specifically, the Subject Alternative Name (Common Name) on the certificate exactly matches the domain name by which we will refer to your server, either through public DNS or a hosts entry, eg: yourdistrict.com.
-
Import the certificate into the LDAP server as described in Appendix A of this
-
Export the certificate in .p7b format as described in Appendix B of this document, and send to your
-
Create a firewall rule that port forwards port 636 to your LDAP server, permitting inbound traffic from 59.134.128/26.
-
Contact your installer and indicate you are ready for
Appendix A – Importing a Certificate
-
If you haven’t done so already, create an external DNS name for the LDAP server you will be exposing to this integration eg., terravistatech.com.
-
Use a third-party major commercial certificate authority and order an SSL certificate for the DNS name you just Important: the DNS name you just created must be the Subject Name (Common Name) of the certificate. To simply things greatly, make sure you create the certificate request from the LDAP server itself, not from another machine.
-
Import the certificate into the Computer Account -> Personal
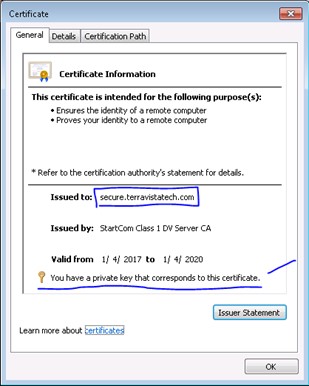
When done correctly, your certificate will have the external DNS name in the “Issued to:” field, and there will be a message indicating “You have a private key that corresponds to this certificate”.
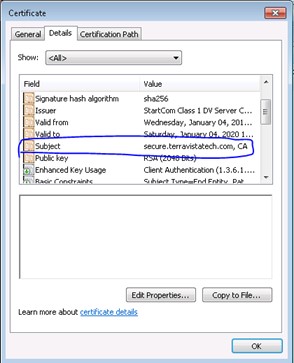
Under the “Details” tab, you will see the server name in the “Subject” field:
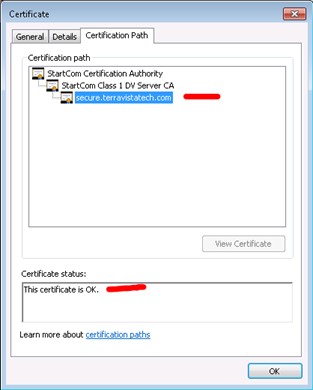
In the Certification Path, you will see the whole path is valid:
4. Once you have the certificate in the Computer Account personal store, it needs to be copied over into the Active Directory Domain Service personal store:
-
-
From within MMC with the Computer account personal store still visible, Click File, click Add/Remove Snap-in, select Certificates from the available snap-ins, and then click
-
In Add or Remove Snap-ins, click Service account to view the certificates that are stored in the service's personal store, and then click
-
In Add or Remove Snap-ins, click Local computer, and then click
-
In Add or Remove Snap-ins, click Active Directory Domain Services, clickFinish, and then click
-
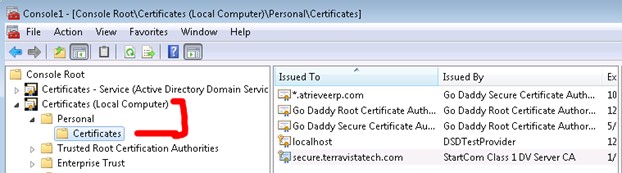
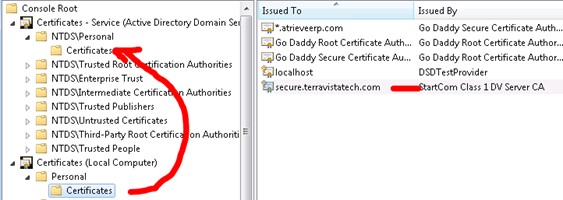
In the console tree, expand Certificates - Service (Active Directory Domain Services), expand Personal, and then expand
-
Copy your imported certificate from Certificates (Local Computer) / Personal / Certificates to Certificates - Service (Active Directory Domain Services) / Personal/Certificates
-
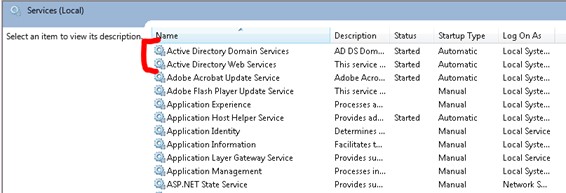
5. Start->Run msc, Restart Active Directory Domain Services and Active Directory Web Services:
Appendix B – Exporting the Certificate
-
Start MMC and Add/Remove Snap-In -> Certificates -> Computer account -> Local
-
Select the certificate you imported, eg. “secure.yourdistrict.com” and right-click -> all tasks -> Export
-
Do not export the private
-
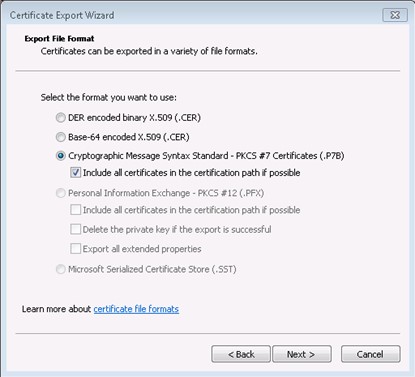
Choose .p7b format with “Include all certificates in the certification path if possible"
-
Email your installer the .p7b