
Header
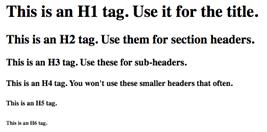
The <h1> tag defines a level-one header on your page. This will usually be the title, and there will ideally only be one on each page.
<h2> defines level-two headers such as section headers, <h3> level-three sub-headers, and so on, down to <h6>.
Example:
<h1>Big and Important Header</h1>
<h2>Slightly Less Big Header</h2>
<h3>Sub-Header</h3>
Result:
Paragraph
The paragraph tag starts a new paragraph. This usually inserts two line breaks.
Example
<p>Your first paragraph.</p>
<p>Your second paragraph.</p>
Result:
Your first paragraph.
Your second paragraph.
You can also use CSS styles in your paragraph tags, like this one which changes the text size:
<p style="font-size: 120%;">20% larger text</p>
Line Break
The line break tag inserts a single line break:
Example:
<p>The first line.<br>
The second line</p>
Bold
This tag defines important text. In general, that means it will be bold.
Example:
<strong>Very important things you want to say.</strong>
Result:
Very important things you want to say.
Italics
The <em> tag identifies emphasized text, which generally means it will get italicized.
Example:
<em>An emphasized line.</em>
Result:
An emphasized line.
Link
The <a>, or anchor, tag lets you create links. A simple link looks like this:
Example:
<a href="//www.makeuseof.com/>Go to MakeUseOf"</a>
The “href” attribute identifies the destination of the link. In many cases, this will be another website. It could also be a file, like an image or a PDF.
Other useful attributes include “target” and “title.” The target attribute is almost exclusively used to open a link in a new tab or window, like this:
Example:
<a href="//www.makeuseof.com/" target="_blank">Go to Make Use Of in a new tab</a>
Result:
Go to Make Use Of in a new tab
Example:
The “title” attribute creates a tooltip.
<a href="//www.makeuseof.com/" title="This is a tool tip">Hover over this to see the tool tip</a>
Result:

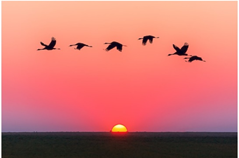
Image
If you want to embed an image in your page, you’ll need to use the image tag. You’ll normally use it in conjunction with the “src” attribute. This specifies the source of the image, like this:
Example:
<img src="wp-content/uploads/2019/04/sunlit-birds.jpg">
Result:
As you might expect, the “height” and “width” attributes set the height and width of the image. In general, it’s a good idea to only set one of them so the image scales correctly. If you use both, you could end up with a stretched or squished image.
Ordered List (Numbered list)
The ordered list tag lets you create an ordered list. In general, that means you’ll get a numbered list. Each item in the list needs a list item tag (<li>), so your list will look like this:
Example:
<ol>
<li>First thing</li>
<li>Second thing</li>
<li>Third thing</li>
</ol>
Result:
-
First thing
-
Second thing
-
Third thing
Unordered List (Bulleted list)
The unordered list is much simpler than its ordered counterpart. It’s simply a bulleted list.
Example:
<ul>
<li>First item</li>
<li>Second item</li>
<li>Third item</li>
</ul>
Result:
-
First item
-
Second item
-
Third item