
GL Interface Guide
Overview
This feature allows you to create multiple GL accounts or update existing ones using a spreadsheet. You can choose between using hand-typed descriptions or the GL Dictionary to fill in the description field.
Step 1: Set Up Your GL Interface Profile
-
Go to: Finance Setup > Interface Setup Menu > General Ledger File > Add.
-
Choose the setup method:
-
Using GL Dictionary Descriptions: No changes needed to your Master Profile.
-
Using Hand-Typed Descriptions:
-
Navigate to: Finance Setup > Profiles > Master Profile.
-
Remove
GAorGfrom the "Dictionary Validation" field. This changes "Comment" to "Description" in the GL Interface Profile
-
-
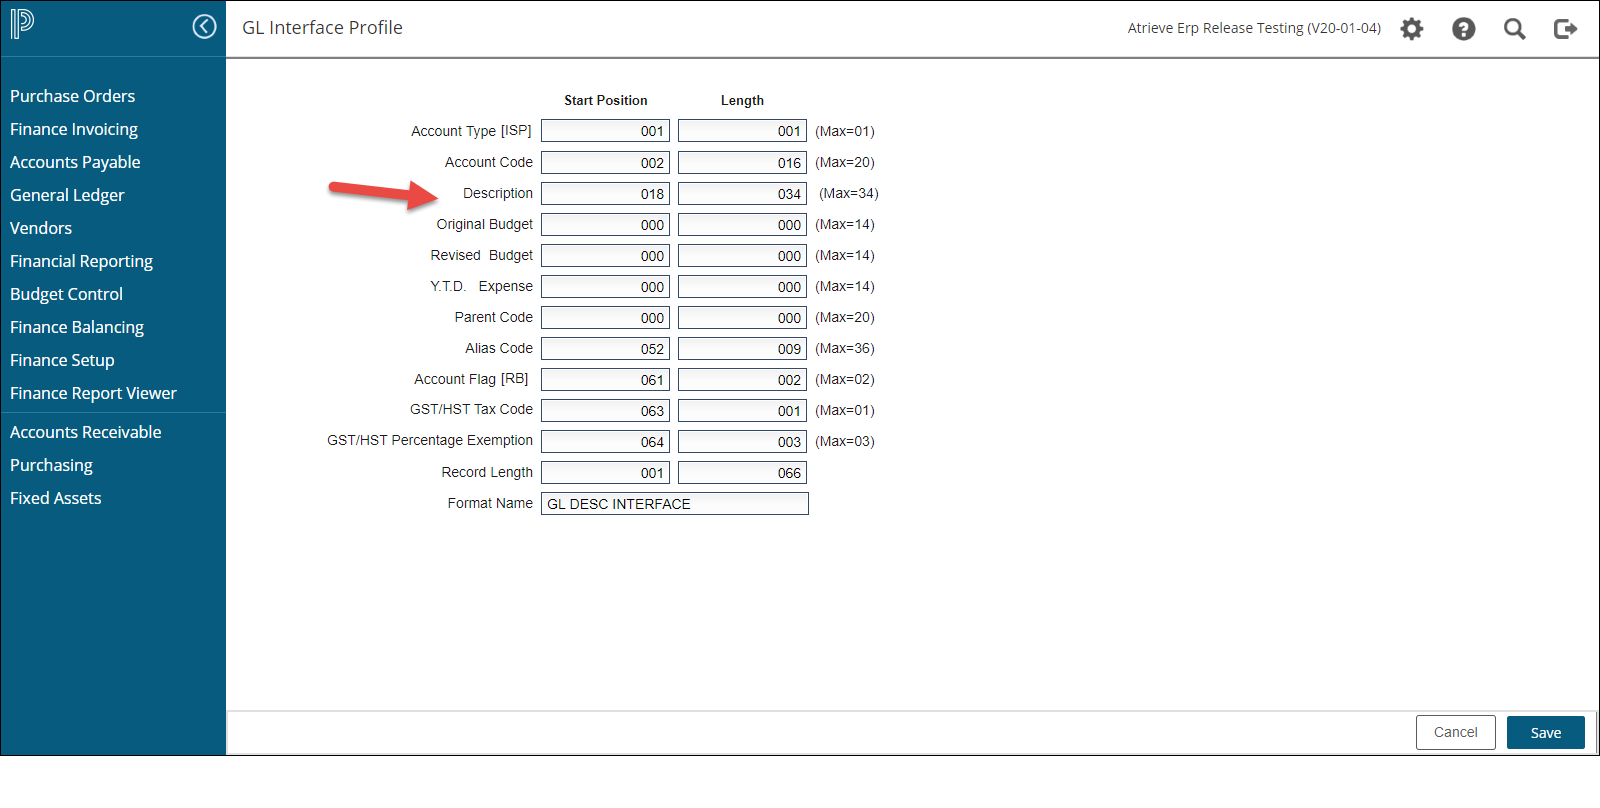
GL Interface Profile, after removing GA from Master Profile
Step 2: Prepare Your Spreadsheet
-
Define Required Fields:
-
Account Type [ISP]:
-
Enter
Pfor Parent Account. -
Enter
Sfor Subordinate Account (linked to a parent). -
Enter
Ifor Independent Account (most common).
-
-
Account Code: Enter the GL account without special characters (e.g., dashes).
-
Account Flag [RB]:
-
For Revenue/Expense GLs with a Budget, enter
RB. -
Leave blank for other account types like assets or liabilities.
-
-
GST Tax Code: Enter the default tax code for the GL account.
-
GST Exemption %: Enter the rebate percentage, if applicable.
-
Record Length: Define the length of each field as per your profile setup.
-
-
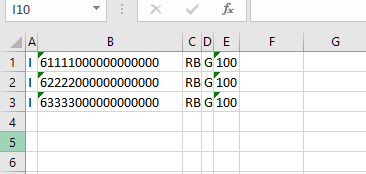
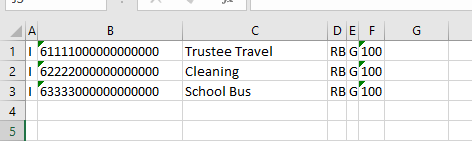
Format the Spreadsheet:
-
Match column widths to the profile setup, the length is the column width (e.g., if the GL account code is 20 characters, set the column width in your spreadsheet will be 20).
-
Remove dashes from your GL to ensure enough Characters Max for GL is 20.
-
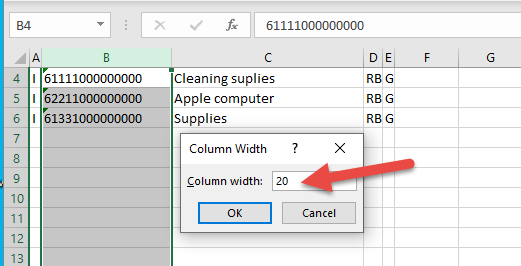
Spread sheet set up for Example 1, using dictionary descriptions.
Spread sheet set up for Example 2, using hand typed descriptions.
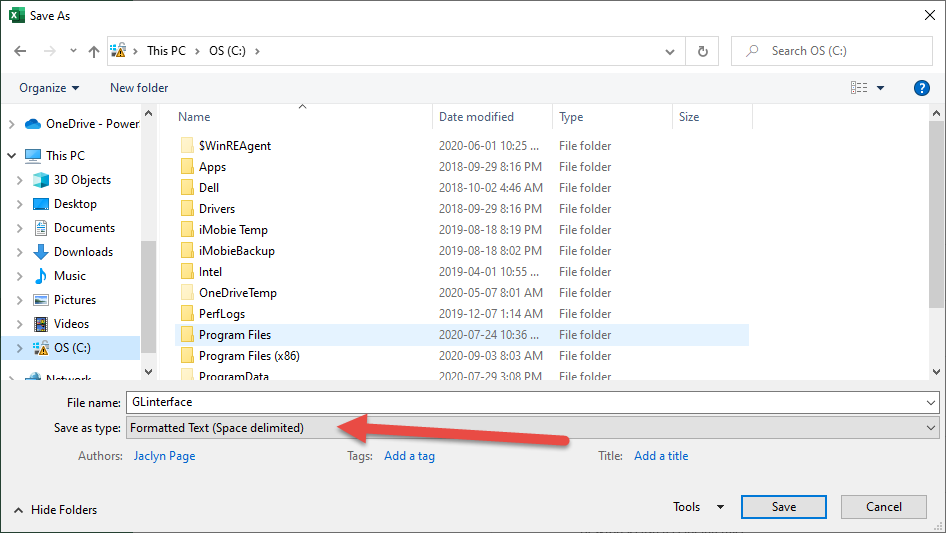
Save the File:
-
File Type: Save as .prn (Formatted Text - Space Delimited).
-
Use a short, simple file name with no spaces or special characters.
Step 3: Import the File
-
Go to: Finance Balancing > Interfaces > General Ledger and select your Profile.
-
Upload the File:
-
Click the File Upload button, select your
.prnfile, and confirm. -
The system will auto-fill the conversion file name.
-
-
Set the Import Year:
-
Enter the desired year. If importing into multiple years, repeat the process for each year.
-
-
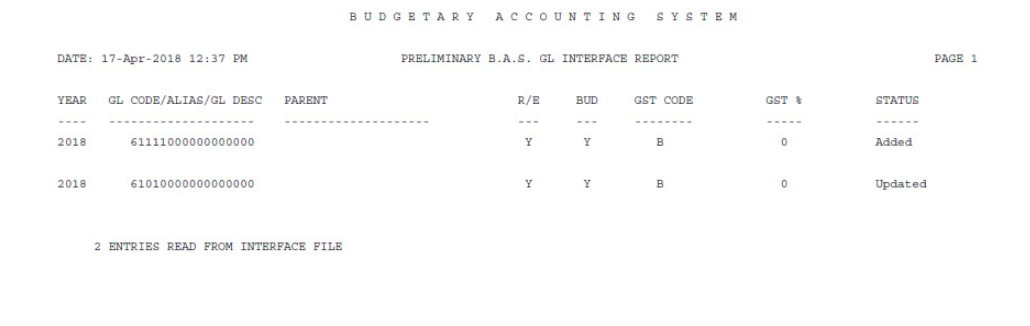
Preliminary Run:
-
Always run as Preliminary to check for errors.
-
Review the error log (available in the Finance Report Viewer) and resolve issues.
-
-
Final Run:
-
Once error-free, run as Final to complete the process.
-
Tips & Reminders
-
Adding vs. Updating: Newly added accounts will show a status of "Added," while updated accounts will show "Updated."
-
Reverting Master Profile Changes: If you changed the Master Profile for hand-typed descriptions, remember to revert it by re-adding
GAorGto the "Dictionary Validation" field.
General Ledger File Fields
-
You may import a text file which can be used to create GL accounts. The next file can be prepared either by a report run from the atrieveFinance accounting system, from another system or by creating a file using a text editor. Once the file is created, you may define the format of the file by specifying the locations of the various pieces of data required to fill in a general ledger record. Once specified, you can select the processing module and import the text file to create general ledger accounts.
-
Each field requires the entry of a start position and the length of field found in the external file to be interfaced to the system.
-
The 'MAX' fields show the maximum length of field used by the system.
Account Type
-
Enter 'P' for parent account.
-
Enter 'S' if creating a subordinate account to an existing parent account.
-
Enter 'I' if creating an independent account not attached to a parent. Note: If you don't supply this element the program will default all accounts to 'I'.
Account Code
-
Enter the GL account being added. Do not include any additional characters such as dashes.
Description/Comment
-
If GL descriptions are NOT generated from the dictionary code descriptions (based on the ‘Dictionary Validation’ field in the master profile), this field can be used to upload a GL description. If dictionary validation is turned on, the text for this field will indicate COMMENT and a comment can be uploaded for this GL.
Original Budget, Revised Budget, Ytd Expense
-
This fields are no longer used within this interface.
Parent Code
-
Enter the GL parent account if applicable. Do not include any additional characters such as dashes.
Alias Code
-
Enter the alias account if known (this can also be entered later through the ‘Mass Alias Update’, or manually through ‘GL Account Changes’. Do not include any additional characters such as dashes.
Account Flag [R/B]
-
This field enables the revenue/expense flag and the budget flag to be updated. If the account is not a revenue/expense account (ex. asset/liability), or not a budget account, leave the associated field position blank. These flags can also be updated later through the ‘Account Status Mass Update’ menu.
GST Tax Code
-
Enter the default tax code that will be used by the GL account. This can be also be updated through the ‘GST GL File Update’ menu (8,8)
GST % Exemption
-
Enter the GST % exemption that will be used by the GL account. This can be also be updated through the ‘GST GL File Update’ menu (8,8)
Record Length
-
Enter the physical length of the record in the interface file. This length is used by the program to open the file and Must be the file's proper record length. The length can be determined by adding the length to the start position for the last field defined in the file.
Format Name
-
This is the descriptive field that is displayed on the processing selection and on the profile maintenance screens so that you can identify various formats.
Start Position
-
Enter the start position in the interface input file where the field data begins. The first position in the file is 'ØØ1'.
Length
-
Enter the length of the field in your interface input file (cannot exceed maximum indicated).