
If after reviewing the employee’s schedule(s), you are required to enter new schedule(s) or edit the employee’s existing schedule(s), perform the steps listed below:
-
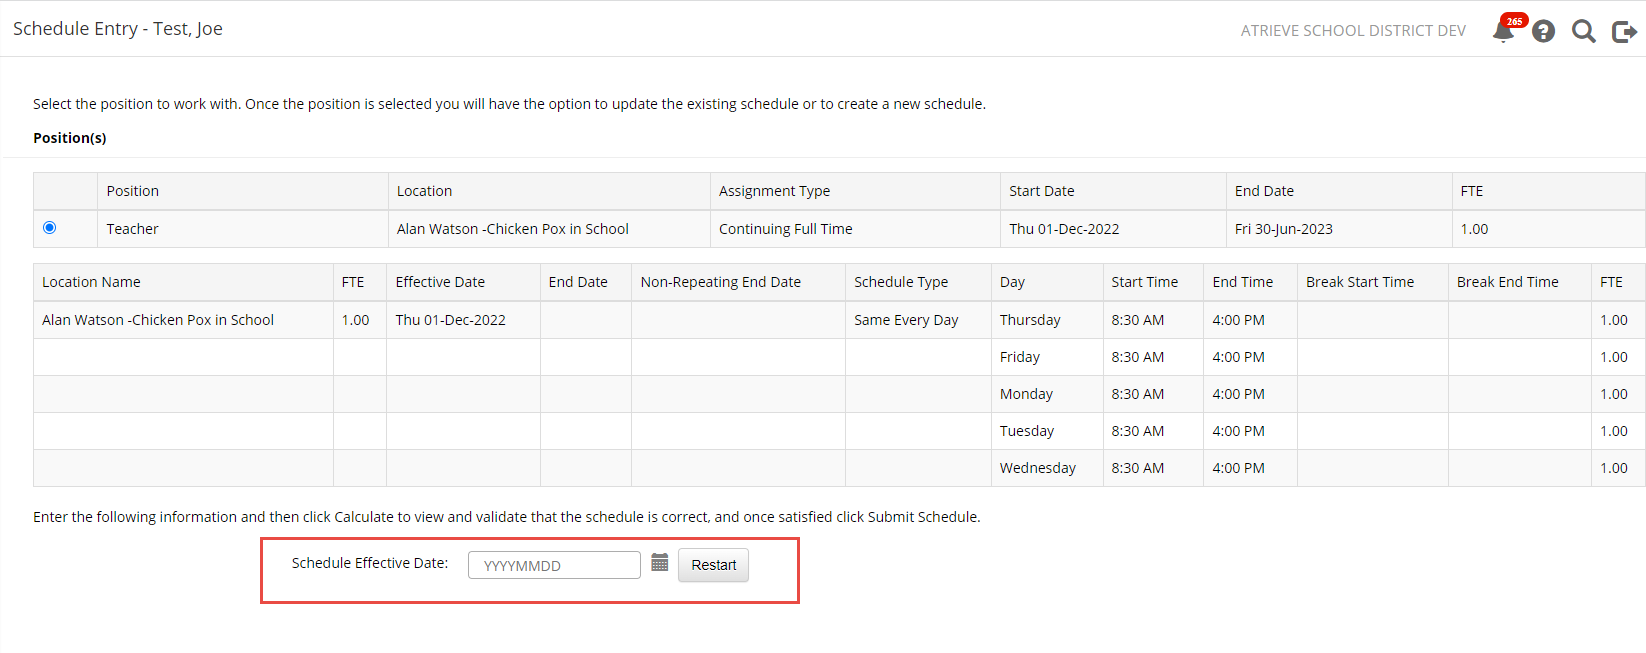
If the employee has multiple positions, select the radio button for the position schedule that requires entry or a change.
-
Click on the calendar icon to choose the date your schedule takes effect.
NOTE: This will usually be the same as the Start Date for the selected position listed above. However, it may be different for semester teachers who change their working hours without changing their assigned hours.
If you need to change the selected Schedule Effective date, click Restart.
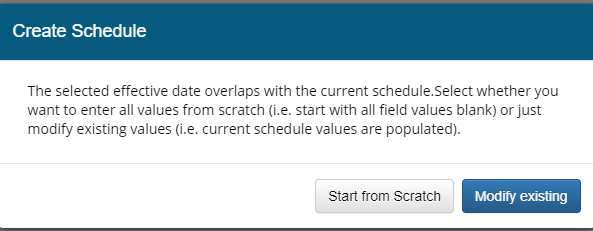
If an effective date is entered that overlaps an existing schedule, the option to define the schedule from scratch or to edit the existing schedule may be presented.
There are many different options that you can use to help define your schedule. Users must choose one in order to proceed with the creation of a schedule:
3. Once you’ve defined a schedule effective date, pick the schedule type that most closely matches this employee’s working hours: (please note you may not see all of these options)
-
Enter every day explicitly
-
Choose this option if the days defined in the schedule need to be customized one day at a time up to a schedule end date. This type of schedule provides the greatest flexibility for those employees who work schedules that vary greatly from one day to another.
-
-
Every Day
-
Choose this option to define the employee’s schedule as a 1-day schedule that repeats each day, starting from the Schedule Effective Date.
-
-
Every Week
-
Choose this option to define a schedule the employee’s schedule as a 5-day schedule that repeats each week, starting from the Schedule Effective Date.
-
-
Every 2 Weeks
-
Choose this option to define a schedule that repeats every 2 weeks but each day within the two weeks can have a different schedule if necessary.
-
-
Every X Number Of Days
-
Choose this option to define the employee schedule as a X- day schedule that repeats every X Days, starting from the Schedule Effective Date. Also indicate if the employee schedule is to skip over Stat Holidays, Teaching Holidays, District Pro-D Days, Location Pro-D Days, and Saturdays and Sundays.
-
4. If the End Time Calculation Assistant appears, the system can automatically calculate the employee’s schedule end time. Enter the following parameters:
-
-
Enter the employee’s expected schedule Start Time.
-
Enter the employee’s Paid Hours per Day or Paid F.T.E. Per Day.
-
The system will calculate and display the Calculated End Time for each day in the employee’s schedule.
5. Click Calculate to display the proposed schedule for the chosen position.
6. Edit the schedule as necessary and then click the Submit button when done.
Click Remove to remove any schedule lines for days in which the employee is not scheduled to work.
7. Use the Validate Schedule to have the schedule checked for rules. Possible rules, as defined by HR:
-
-
Correct amount of break time
-
Schedules Hours or FTE matches assigned Hours or FTE
-
8. When correct, click Submit to save the employee schedule and submit it to HR.
9. If any warning or error messages appear, you may be required to further edit the schedule to adhere to any rules defined by the district. Here is an example:

10.If the employee’s schedule is acceptable by the system, the schedule is updated on the employee’s position and the Schedule Review task is marked as ‘Completed’.
Add Schedule Line
Each school has a default set of AM/PM bell times. The FTE associated with the AM and PM are also preset. Some employees may not follow this default and the schedule must be overridden.
Proposed Schedule:

For example, this employee actually works from 8:20 to 12:00, which, in this example is the equivalent of 0.6 FTE (the school’s preset AM is 8:00 to 11: 30 and equal to 0.5 FTE).
In the afternoon, the teacher works from 12:45 to 3:00, which is the equivalent of 0.4 FTE (the school’s preset PM is 12:30 to 3:15 and equal to 0.5 FTE).
To adjust this proposed schedule, start with adjusting the AM
Then use the Add Schedule Line to add in the PM line:

Add in the date and either type in the time or click in the PM toggle