
To add a new entry, click the Add Journal Entry button. When the add page opens you are prompted to enter the Fiscal Period, Batch Type and a Journal Entry Name:

-
The current Fiscal Period will be selected, but you can select a different period from the dropdown
-
You can select a Batch Type from the dropdown, or simply begin typing the batch type name and the list will filter to show possible matches
-
The combination of Fiscal Period, Batch Type and Journal Entry Name must be unique, so that will need to be a consideration when you enter the name. If the combination of values results in the record being not unique, an error message will display
-
Click Create and the page will refresh to display the entry grid
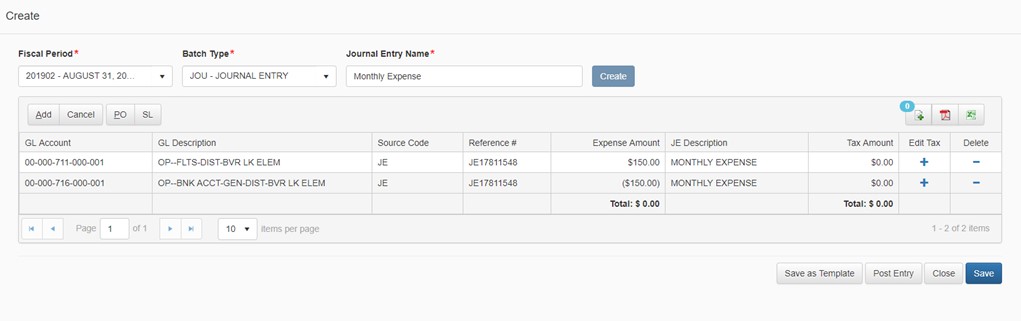
The grid includes:
-
-
GL Account – enter the General Ledger account or click on the search icon to find the appropriate GL account. This is a required field. Refer to section below for more information about the GL Search
-
GL Description – the description is automatically populated once you select a General Ledger
-
Source Code – enter the source code to be associated to the entry. This is a required field
-
Reference # - enter the reference number. This is an optional field
-
Expense Amount – enter the expense amount. This is a required field
-
JE Description – enter the description. This is an optional field
-
Tax Amount – tax amount will display if it has been applied
-
Edit Tax – click the plus sign to view or update the tax details. Refer to section below for more information about the tax details
-
Delete – click delete to remove the row from the grid
-
Additional Columns:
-
-
Click the PO button above the grid to add the Purchase Order columns (shortcut key Alt+P)
-
PO # – enter the PO number.
-
PO Amount – enter the PO amount
-
-
Click the SL button above the grid if you use subledgers
-
-
-
Enter a row in the grid and then click the Add button above the grid to add another row (shortcut key Alt+A)
-
When a new row is added as you enter and tab through the row, the system will automatically populate certain fields with the information entered in the previous row. Field values that are duplicated in a row are: Source Code, Reference#, JE Description, and PO # (if that column is displayed)
-
Newly added or changed field values will be marked with a red triangle at the top left of the field. Once the entry is saved the visual indicator will be hidden
-
To save the journal entry structure as a template, click Save as Template. The new template will display in the Reusable Template grid on the main Journal Entry landing page. For more details about templates refer to the section below in this document.
-
To Cancel all changes made within the grid since the last time the record was Saved, click Cancel
-
To Save the Journal Entry click Save. If any required information has been missed you will receive a warning message, otherwise the record will save, and the focus will remain on the page
-
To attach a document, click the add document icon. Note that you must Save the new record before you can attach documents. Once a record is saved, you can add, view, and delete attachments as needed
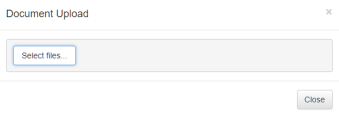
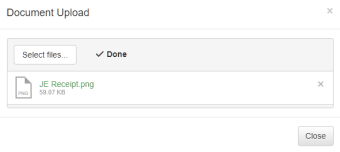
Note: you will not be able to attach documents and the document icon will not display if you do not have a document storage solution configured.
-
To output the contents of the grid to PDF format, click the PDF icon
-
To output the contents of the grid to Excel format, click the Excel icon
-
When you are ready to process the entries and you have the permissions to Post, click Post Entry to finalize the batch. Once entries are posted they can be searched for and viewed on the Journal Entry Search page (details below in this document). In addition, they can be viewed in atrieveFinance, in GL Inquiry. If you don't have permissions to Post, then click Submit to have your Journal Entry Batch reviewed by your Approver.
-
Click Close to return to the Journal Entry main landing page, or simply click on a link in the left-navigation menu to navigate away from the page. If you click Close, and changes have been made, a message will prompt you to choose whether to save or disregard the changes.
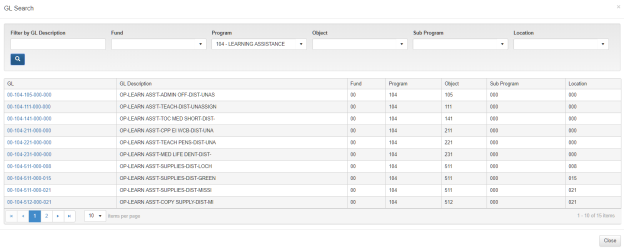
GL Account Search
In the GL field in the entry grid you may type the GL directly, or if you are not sure, click on the magnifying glass to search for a GL
When the search opens you are presented with several search filters (the filters that display is dependent on your districts setup).
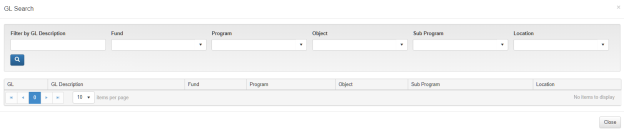
In this example, you may filter the list of GLs' by:
-
GL Description
-
Fund
-
Program
-
Object
-
Sub Program
-
Location
Enter or select a value and then click the search icon, and the results of the search are displayed. Click on a GL link to select it and the search window will close, and the grid row will be updated with your selection.
Tax Details
The tax details are calculated based on your district settings.
-
Click on the plus sign to view/edit tax details
-
Select the Tax Embedded option if the tax is embedded in the amount
-
Optionally, you can adjust the calculated tax amount
-
Optionally, you can adjust the % Exempt
-
If you make changes to the calculated tax amount or the % Exempt, the system will recalculate and display the following information:
-
Amount Exempt
-
Rebate Amount
-
Tax Credit
-
Tax Payable
-
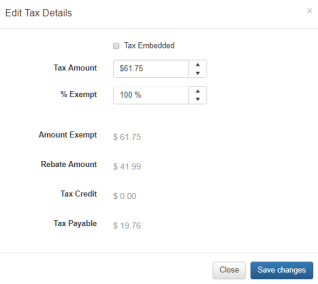
Once you have finished viewing or updating the tax details click Save Changes, and the window will close. Or click Close, to disregard any changes, and return you to the invoking page.