
The Catalogue Upload option is used to create a searchable catalogue using files that have been provided by vendors or compiled in-house. This eliminates the need to manually add items or make mass changes. There are two types of catalogues that can be uploaded: Standard or Learning Resource (LRS). A profile option controls whether LRS catalogues can be uploaded. The 'Catalogue Upload' menu option should only be given to system administrators and the purchasing department.
To begin, choose "Catalogue Upload" from the Requisition Web menu:
*Before uploading the file, review the format to ensure that the correct information is in place and that it has been saved to a .csv format. Only comma delimited files are supported at this time.
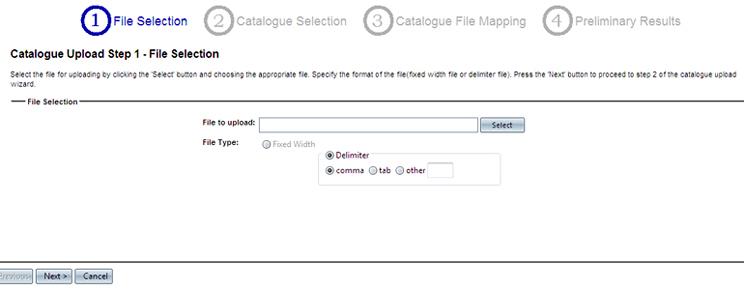
Step 1 - File Selection:
Click "Select" and browse to the .csv catalogue file for uploading. Click "Next" to proceed.
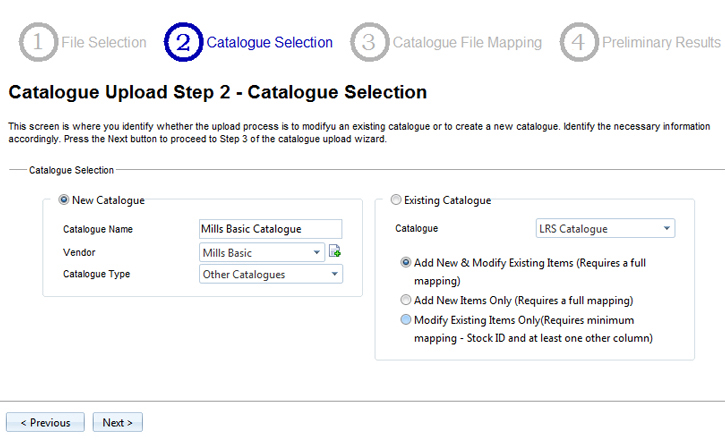
Step 2 - Catalogue Selection:
The catalogue selection screen provides a choice of creating a new catalogue from the file or modifying an existing catalogue.
For new catalogues, a name must be entered and a vendor must be associated. If prompted for a Catalogue type, identify whether it is a standard catalogue or LRS.
For changes to existing catalogues, click on the radio button for 'Existing Catalogue'. Select the catalogue from the drop-down list then choose one of three options:
-
Add New & Modify Existing Items (Requires a full mapping)
-
Add New Items Only (Requires a full mapping)
-
Modify Existing Items Only (Requires minimal mapping – stock ID and at least one other column.)
Click 'Next' to move to the next screen or 'Previous' to return to the file selections screen.
Step 3 - Catalogue File Mapping:
Field mapping links the file's data fields with the Requisition Web system's fields. Field mapping must be done for each catalogue upload. Depending on the type of file and what is being changed, either full or partial mapping will be required.
Mapping can be saved with each new catalogue. When modifying existing catalogues, the saved mapping will be defaulted and will pre-populate and display in the mapping preview.
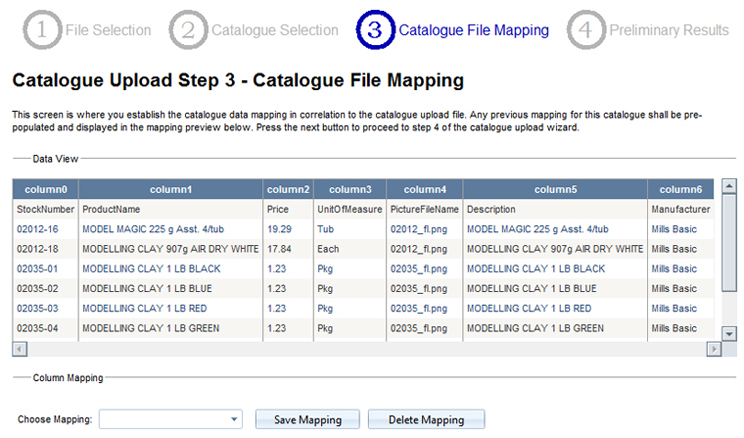
When mapping fields from the file, select the 'data column' that corresponds to the catalogue 'field name' in RQW. Once the association has been made, click the green arrow to map the two together. The 'Mapped Fields' box will display the newly mapped data. Use the sampling displayed in the 'data view' to make the connections.

If the new mapping created will be used again, click 'Save Mapping'. Saved mappings can be used against other catalogue uploads.
*If the file contains a header row, add a (1) to the 'Rows to skip 'box. This will tell the system to ignore the first row.
Once all fields have been mapped accordingly, you can click 'Next' to proceed to the final step.
To remove a mapped field, select it and click on the red X.
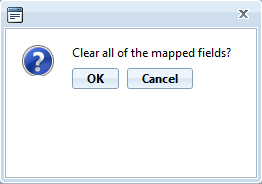
To clear all mapped fields, click on the recycle can icon. A confirmation popup will appear.
Step 4 - Preliminary Results:
This screen displays the first 10 rows of the catalogue as a preview of the column mapping. Ensure that the data in each column displays the expected results. If the mapping is correct, click 'Preliminary' to run a preliminary upload of your data. This process will check the upload file for errors and display the error information below the preview.
If no errors are listed, click 'Finalize' to upload the data into the catalogue.
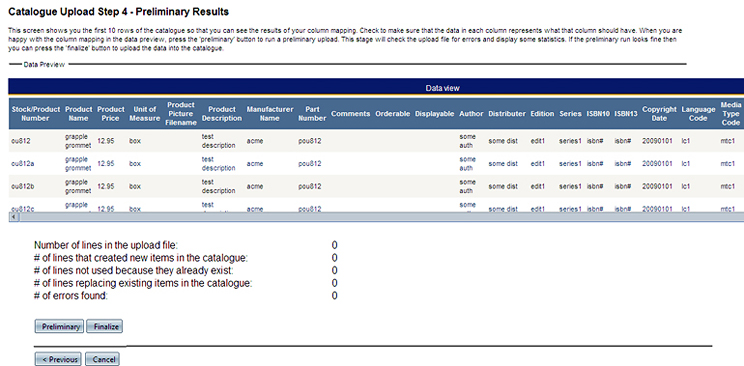
If errors are listed, examine the quantity and click "View Errors".

When viewing the errors, the report will display the Catalogue name, Catalogue Type, and Upload File name. It will display the line upon which the error is occurring, as well as a message explaining the details of the error.
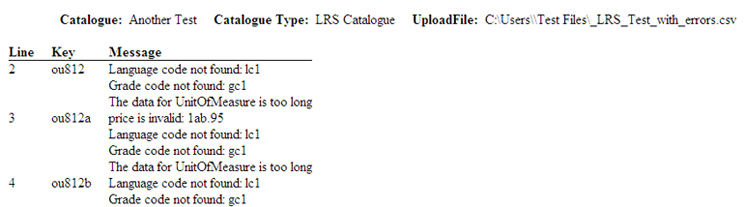
To fix the errors, click on 'Previous' to return to the mapping screen. If the errors exist because of the data in the file, the file will need to be reviewed and the upload process will start again from the beginning.