
Setup Instructions: To be able to mark a dispatched employee as being absent and ensure the absent replacement is paid Sick time, the following field from the Dispatch Search Parameter Profile must be filled in for each impacted group (such as TOCS and CASU):
TOC Absence Payroll & Pay Code(s) This prompt expects at least two fields: the Payroll ID and at least one pay code. All fields must be separated by a slash '/ '
To make this change, the path is Dispatches > Automated Dispatch Profiles > Search Parameters > Search Parameters > Search Parameter Changes. After choosing the group to change, this field TOC Absence Payroll & Pay Code(s) is on Page 2. This field is looking for the payroll to pay these "absent dispatches" on and at least one pay code to use, separated by a "/" For example: TTOC/08 or CASU/10.
The Marking a Replacement Employee as Sick process does NOT create an Absence record for the sick replacement employee. The purpose of this process is to indicate one replacement is using sick time to cover their replacement shift, and to add a new replacement to the Absence record as appropriate. The records created below are all still Dispatches attached to the original Absence record the employee was original called out for. The Dispatch record remains a Dispatch, and will flow to Payroll using Replacement Costing as usual. The main difference will be the Pay Code which has changed to ensure this is paid as sick time, and not as if the employee worked. If a storage bank is being used, this would be set up on the Pay Code in Payroll.
If a Dispatch is Marked as Absent and this needs to be reversed, this can be done by re-selecting the Action Dispatch - Mark as Absence. In this case, the popup question will ask if you want to Un-mark the Rep Emp as being Absent.
Dispatch Reports and AMS (Attendance Management) Screens will will indicate the Absent Replacement is absent for this dispatch record. In HRW, the Dispatch Fields Absence YN and Absence Pay Code fields (in the Dispatches or Absences and Dispatches data tables) can be used for this purpose. This Replacement is Absence field is also available to be displayed in AMW through the AMS Web Group Profile setup.
Scenario One: Sub Employee is Sick and qualifies to be paid for the entire duration of the Dispatch record
-
Load the absence in absence/dispatch changes.
-
While the record is still open, choose the Actions button > Dispatch – Mark as Absence.
-
A popup will come up asking "Do you wish to mark this Rep Emp as being Absent? Click Yes.
-
To confirm the replacement has been successfully marked as Absent, on the bottom of the screen it will display TOC ABS: XX, where XX = the designated Sick Pay Code. (Note: "TOC ABS" generically displays for all of these transactions, whether a TTOC or a CASUAL employee.)
-
With the record still open, choose the Actions button > Dispatch - Add a New Replacement Employee to add a new replacement to this record.
Scenario Two: Sub Employee is Sick and qualifies to be paid for part of a multi-day Dispatch record.
Marking the sick replacement as absent for their dispatch shifts:
-
Load the absence in absence/dispatch changes, then click on Dispatch Details in the replacement header.
-
Click on the date(s) the replacement is sick and use the Cut Line button to remove those entries. This is done to segregate the dates the employee is absent from the dates worked.
-
Click Close to go back to the Summary page.
-
With this Absence / Dispatch record still open, now click on the Actions button > Add a New Replacement Employee.
-
A Prompt will appear to confirm you want to add another replacement employee - select Yes.
-
Re-add the SICK employee. This is done to re-enter the dates removed in Step 2 so these can be marked the dates the employee was absent.
-
On the Replacement Details window that pops up, this time remove all of the records the employee is working so that only the sick dates are left.
-
Click Close to go back to the Summary page.
-
Warnings will appear indicating the Summary and Details dates no longer match - Click OK to these.
-
With the record still open, note the Summary date fields only include the date(s) of absence. On this screen, choose the Actions button > Dispatch – Mark as Absence.
-
A popup will come up asking "Do you wish to mark this Rep Emp as being Absent? Click Yes.
-
To confirm the replacement has been successfully marked as Absent, on the bottom of the screen it will display TOC ABS: XX, where XX = the designated Sick Pay Code. The Summary page will confirm the date(s) for which this employee is being paid Sick time.
Adding a second replacement to cover the dates the first replacement is absent:
-
With the record still open, choose the Actions button > Dispatch - Add a New Replacement Employee to add the new replacement to this record.
-
A Prompt will appear to confirm you still want to add another replacement employee - select Yes.
-
This time, add the NEW replacement employee
-
On the Replacement Details window, again remove all of the records except the dates this replacement will be working.
-
Click Close.
-
Warnings will appear indicating the Summary and Details dates no longer match - Click OK to these.
Scenario Three: Sub Employee is Unavailable for part of a multi-day Dispatch record but does not qualify for Sick Pay
In this case, the original Sub can be removed for the days they are absent, and a new replacement employee added for those days. There will be no reason to mark anyone as being absent, since the original replacement will simply be removed.
-
Load the absence in absence/dispatch changes, then click on Dispatch Details in the replacement header.
-
Click on the date(s) the replacement is Sick and use the Cut Line button to remove those entries.
-
Click Close to go back to the Summary page.
-
With this record still open, now click on the Actions button > Add a New Replacement Employee.
-
A Prompt will appear to confirm you still want to add another replacement employee - select Yes.
-
Add the NEW replacement employee.
-
On the Replacement Details window, again remove all of the records except the dates this replacement will be working.
-
Click Close.
-
Warnings will appear indicating the Summary and Details dates no longer match - Click OK to these.
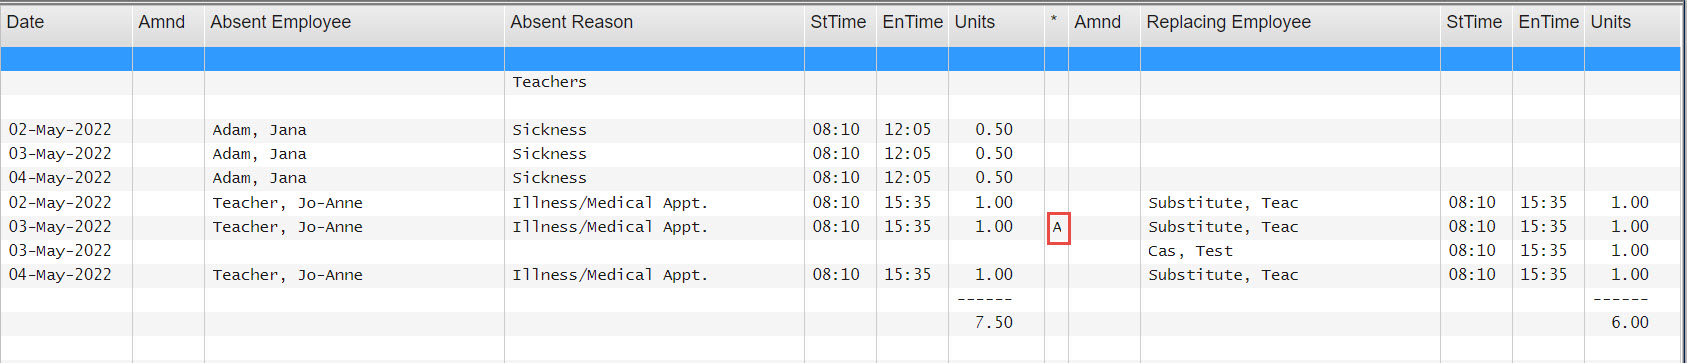
Illustration below shows the AMS screen that would be seen when Teac Substitute has been marked as Sick for May 3rd (while still working May 2 and 4), and Test Cas has been added as the new Replacement employee for this date:
Flowchart
