
An approver or a final authorizer needs to be able to review requisitions and either Approve or Refuse requisition line items. An Approver/Authorizer is someone who has authorization via security builder or via their position code's authorizer field. The common routing workflows are:
-
a requisition is created and routed to a local approver and then routed to a final approver i.e. Requisition > Approver > Final Approver
-
a requisition is created and routed to a final approver i.e. Requisition > Final Approver
-
once a final approver has completed their task and approved the requisition, it is then routed to Purchasing in Atrieve Finance for further buyer processing
An approver can access requisitions in one of three ways:
-
from Task Manager
-
Requisition tasks that display in Task Manger are controlled by the logged in users Location Security
-
Task Manager can be accessed by clicking the Bell icon at the top right of the page or by navigating to My Info > Tasks > Task Manager
-
-
from Requisition Search
-
Navigate to Finance > Requisition & Purchasing > Requisition Entry > Requisition Search
-
-
from an Email Notification
-
if notifications have been configured in eForms routing then the approver would receive an email and the email includes a link back to the requisition
-
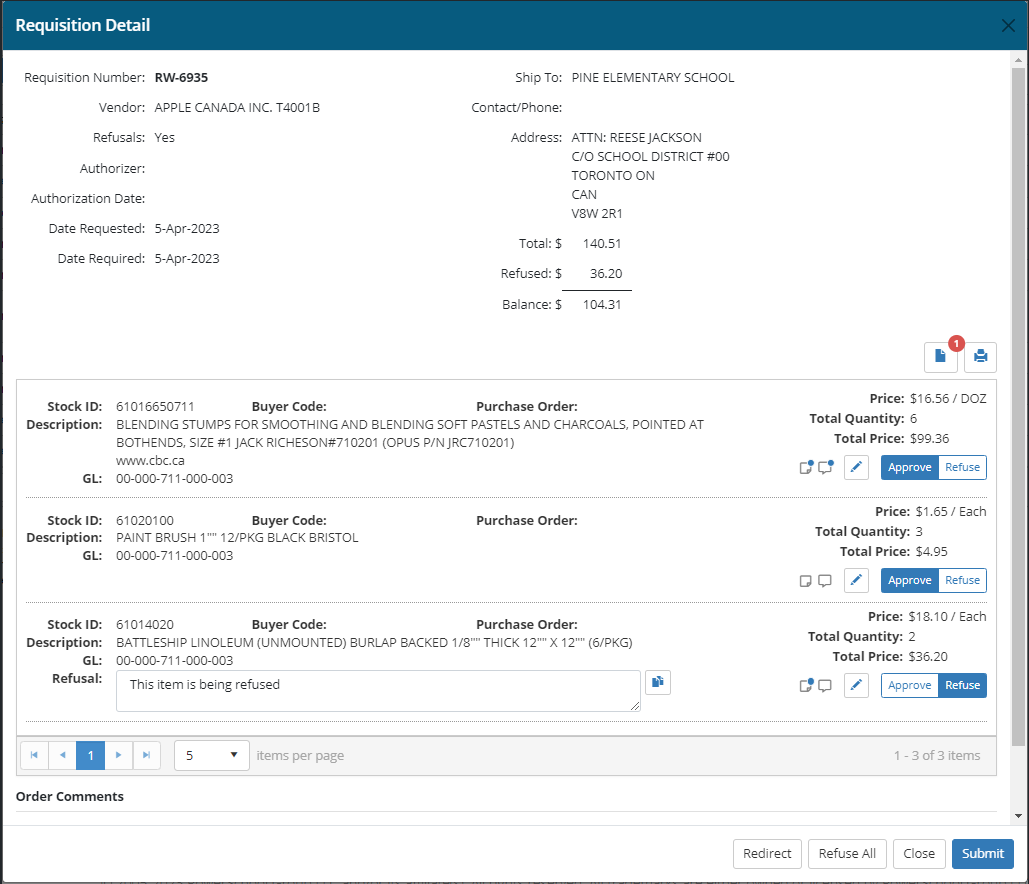
Whether accessing the requisition through requisition search, task manager, or email the same popup page is displayed 'Requisition Detail'.
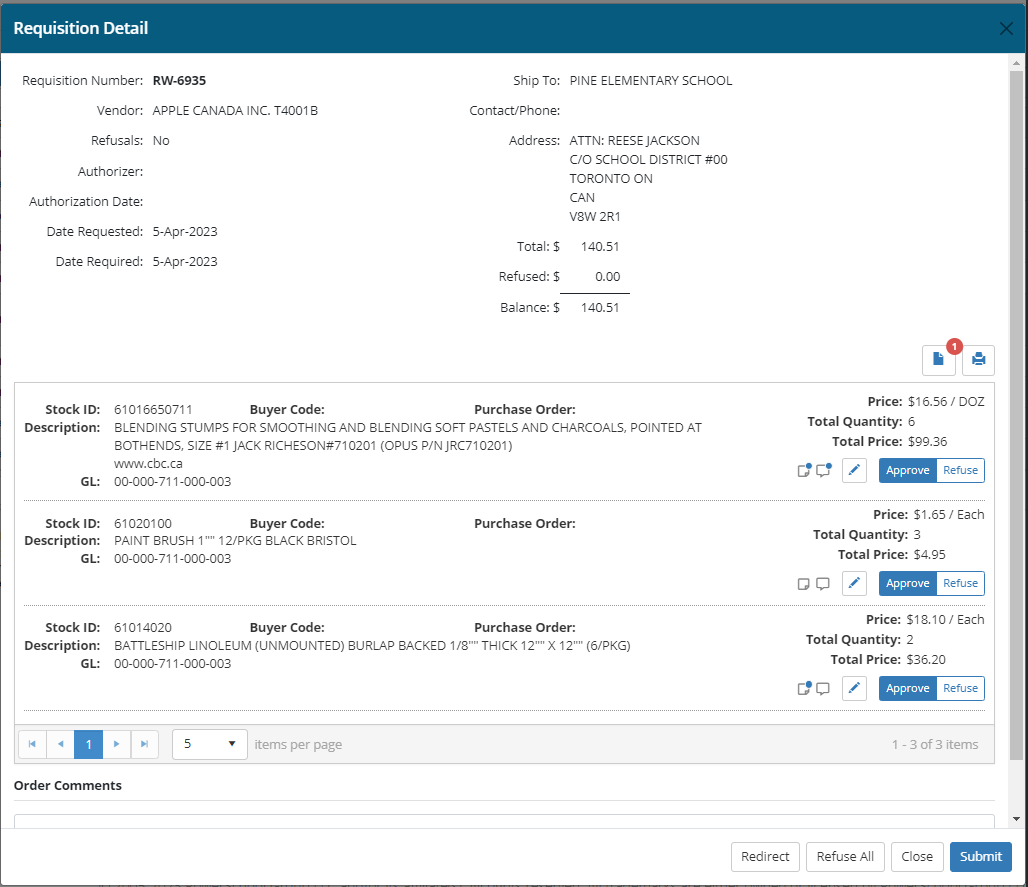
Everything is read-only on this page with the following exceptions:
-
approver/authorizer may modify the GL/GL distribution by clicking the Edit pencil
-
approver/authorizer may select to Refuse Individual lines or Refuse All lines
-
approver/authorizer may upload supporting documents
-
approver/authorizer may print the requisition detail
-
approver/authorizer may Submit the requisition for further processing
-
approver/authorizer may view requisition Activity
-
approver/authorizer may redirect the requisition to another approver/authorizer
Redirect button - rules for when this button is displayed/enabled:
-
The requisition has not yet been authorized
-
The logged in user has been defined as an authorizer in eForms routing
-
The Profile setting has been set to turn the redirect feature on
Redirect Feature - Profile Setting - there is a profile setting to turn on the Redirect feature, navigate to Tools > Security & Setup > Profile Maintenance - Tabbed and select the RQW tab. There is a profile for ‘Use redirect feature with routing (Y/N)’
Approve / Refuse Line Items
The approver may Approve or Refuse one or more lines, or Refuse all lines
-
By default the line item(s) are in an Approve state (toggle is set to Approve)
-
To refuse a line item click the Refuse button, to reverse this action click on the Approve button.
-
When a line is refused, a refusal reason is required for that item
-
On clicking Refuse the Refusal Reason text field will be enabled. If the line is not refused the text field does not display
-
If you do not enter text into the refusal reason for all lines that are refused and click the Submit button an error message will display “Refusal reason is required.”
-
-
If the Refuse All button is selected then all lines will be updated to Refuse
-
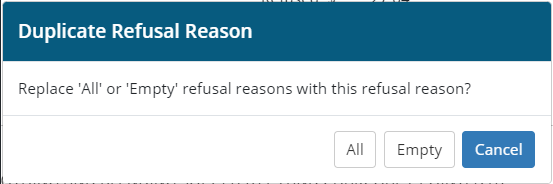
You are required to enter a refusal reason for all lines refused. If you would like to apply the same reason to all lines then select the Copy icon next to the refusal reason field.
-
Clicking the Copy icon will copy the refusal reason from that item to all other items where the Refuse checkbox is selected. You will have the option to copy the refusal reason to All lines, or only those lines where the refusal reason is Empty
-
Submit Requisition
If the logged in user is an approver (not a final authorizer)
-
If all items are flagged as 'Approve' then when you click Submit the requisition will continue through the routing process to the next approver or final authorizer and a success message is displayed that includes the newly created requisition number, and you will be returned to the previous page (i.e. the Search page or the Task Manager page). The status of the requisition will be ‘Pending’
-
If one or more items are flagged as 'Refuse' then when you click Submit you will receive a message indicating that you are not permitted to perform this action
-
Error message: "You are not permitted to refuse individual lines. Change refused line items back to 'Approve' or click 'Refuse All' to refuse the entire requisition."
-
-
If All items are flagged as 'Refuse' then when you click Submit the requisition will continue through the routing process to the next approver or final authorizer and a refusal message is displayed that includes the refused requisition number. The requisition status is updated to 'Refused' and the requisition is re-routed back to the originator. When a requisition is refused the originator receives an email notification that includes details of the refused requisition.
If the logged in user is a final Authorizer
-
If all items are flagged as 'Approve' and you click Submit the requisition will be passed to Purchasing for further buyer processing and a success message is displayed that includes the newly created requisition number, and you will be returned to the previous page (i.e. the Search page or the Task Manager page). The status of the requisition will be ‘Approved’
-
If one but not all items are flagged as 'Refuse' then when you click Submit a success message is displayed and the requisition status would be updated to 'Approved'. Note that the cart is not unlocked for the originator to edit refused lines in this scenario.
-
If All items are flagged as 'Refuse' the requisition status is updated to 'Refused' and the requisition is re-routed back to the originator. When a requisition is refused the originator receives an email notification that includes details of the refused requisition.