
This document describes the setup necessary for enabling the OMTOOL™ fax software to fax purchase orders online. This setup assumes you have already successfully installed OMTOOL™ Fax Sr. on your system (either Windows NT or VMS).
How does the faxing system work?
-
The software first inserts some basic header information into the fax file including your Company Name, Recipient Name, and Recipient Phone Number.
-
It then searches for an associated "FORM" file that contains other information like a) pre-printed form filename, Font, Lines Per Inch, Character Pitch, Number of Attempts, etc. These parameters are added into the header of the fax file.
-
The software prints your purchase order to the file just as if it were a printer, using your existing Purchase Order print profile.
-
Finally, the codes in the fax header are interpreted by OMTOOL™ and used to format the final fax output. Your digitized pre-printed form (if any) is now merged with the content of your purchase order and will be sent to the fax modem when it is available.
Setting Up to Fax
1. OMTOOL™ FAX SR. FOR OPEN VMS
SYMBOLS REQUIRED for VMS
The following symbols must be set up in SRB$LOGICALS:PRDLOGIN.COM
|
a. TSC$FAX_QUEUE |
:== "Name of valid VMS print queue" |
|
b. TSC$FAX_SERVER |
:== "" ! Make sure NT server is not assigned |
NOTE: If the symbol TSC$FAX_SERVER has any value other than "", the system will over-ride the VMS Fax Queue settings and attempt to send faxes via a Windows NT server.
2. OMTOOL™ FAX SR. FOR WINDOWS NT
SYMBOLS REQUIRED for WINDOWS NT
The following symbols must be set up in SRB$LOGICALS:PRDLOGIN.COM
|
a) TSC$FAX_SERVER |
:== "xxx.xxx.xxx.xxx" |
! IP address of NT Server |
|
b) TSC$FAX_DIRECTORY |
:== "cd\faxtransfer" |
! Remember to create directory |
|
c) TSC$FAX_NOTIFY_PO |
:== "you@yourdomain" |
! Email you here if errors |
If the fax is coming from an Alpha to the NT server using ucx, set up the following:
|
d) TSC$FAX_USER |
:== "ftpopr"
|
|
e) TSC$FAX_PASS |
:== "ftpopr"
|
OR
If the fax is coming from a VAX to the NT server using multinet, set up the following:
|
d) TSC$FAX_USER |
:== "user ftpopr" |
|
e) TSC$FAX_PASS |
:== "password ftpopr" |
B. THE .FORM FILE
1. POFAX0.FORM
This file must be in the FAXSR$FORM directory. It contains additional fax formatting information, including the filename of your digitized, pre-printed Purchase Order form.
NOTE: If this file exists in this location, the program will use it. If you want to bypass these commands, delete or rename the file, or comment out the command lines.
TROUBLESHOOTING NOTE: If this file exists in the proper directory, but the formatting is not being applied to your fax, check the VMS protection level of this file. It should at least be set to (RWED,RWED,RWE,RE).
Sample contents of a FAXSR$FORM:POFAX0.FORM file would be:
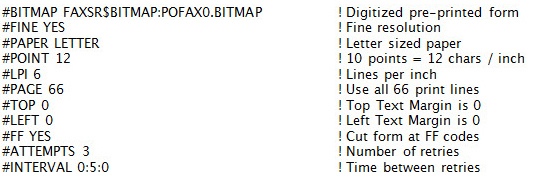
The Margin commands are of particular importance, as they are used to position the text of your purchase order on top of the digitized pre-printed form.
The top margin indicates the number of scan lines from the top to start printing the text of your PO. At fine resolution, there are 200 scan lines per inch.
The Left margin indicates ½ pixels. That is, a left margin setting of 100 would cause the text to be printed 50 pixels from the left size of the page.
Additional configuration keywords, as well as instructions on how to create a digitized pre-printed form can be found in the OMTOOL™ documentation.
C. THE .COVER FILE
1. POFAX0.COVER
This file must be in the FAXSR$COVER directory. It contains custom Purchase Order cover page information, including the filename of your digitized, pre-printed legal language that can be included optionally with your PO faxed online.
Note: If this file exists in this location, the program will use it. If you want to bypass these commands, delete or rename the file, or comment out the command lines.
Troubleshooting Note: If this file exists in the proper directory, but the formatting is not being applied to your fax, check the VMS protection level of this file. It should at least be set to (RWED,RWED,RWE,RE).
Sample contents of a FAXSR$COVER:POFAX0.COVER file would be:
|
//FORM FAXSR$BITMAP:POFAX0_COVER.BITMAP |
! Digitized pre-printed form |
|
//FONT 998 |
! Font Selection |
|
//POINT 12 |
! 10 points = 12 chars/inch |
|
//LPI 6 |
! Lines per inch |
|
//INCHES 11 |
! Page Length |
Following these initial commands, certain fields can be positioned on the page, which will be filled by either FAXSR or by the Purchase Order
The Margin commands are of particular importance, as they are used to position the text of your PO on top of the digitized pre-printed form.
The top margin indicates the number of scan lines from the top to start printing the text of your PO. At fine resolution, there are 200 scan lines per inch.
The Left margin indicates ½ pixels. That is, a left margin setting of 100 would cause the text to be printed 50 pixels from the left size of the page.
Additional configuration keywords, as well as instructions on how to create a digitized pre-printed form can be found in the OMTOOL™ documentation.
D. THE .BITMAP FILES
1. POFAX0.BITMAP (or any other filename as specified in POFAX0.FORM)
This file must be in the FAXSR$BITMAP directory. This is your digitized, pre-printed Purchase Order form.
First generate through scanning, your digitized PO form. This image MUST be at 200 dots (or pixels) per inch for FINE resolution, and exactly 8½ x 11" in size. Save this file in the Zsoft .PCX format. You will probably prepare this on a Windows machine.
Keep in mind that it is not possible to position this image in OMTOOL™. If you want to move portions of the image downward on the page, this must be done in the image itself. That is, move the contents of the image downwards and resave the .PCX file. OMTOOL™ will always position the top left corner of your image at Row 0, Column 0.
After preparing your file, eg., POFAX0.PCX, send it to the fax server via FTP. Place this file in the FAXSR$BITMAP directory.
SET DEF to FAXSR$BITMAP, then enter the following command:
FAXSR CONVERT POFAX0.PCX POFAX0.BITMAP
Troubleshooting Note: If this file exists in the proper directory, but the bitmap is not being applied to your fax, check the VMS protection level of this file. It should at least be set to (RWED,RWED,RWE,RE). Also double check the naming of this file in your POFAX0.FORM file.
If you experience problems, see Chapter 27 of the FAX Sr. System Manager's Guide.
2. POFAX0_COVER.BITMAP (or any other filename as specified in POFAX0.COVER)
This file must also be in the FAXSR$BITMAP directory. This is your digitized, pre-printed Purchase Order legal language and custom cover page layout.
This file is picked up when the parameter "Send Legal" is checked when faxing a purchase order online, provided that POFAX0_COVER.FORM is configured correctly.
Prepare this image in the same way as POFAX0.BITMAP, as instructed above.
Troubleshooting Note: If this file exists in the proper directory, but the bitmap is not being applied to your fax cover page, check the VMS protection level of this file. It should at least be set to (RWED,RWED,RWE,RE). Also double check the naming of this file in your POFAX0_COVER.FORM file.
E. PREDIAL.DAT
This file allows the system to interpret phone number prefixes and either a) dial numbers with area codes as local numbers, or b) dial certain numbers with alternate prefixes, like when a special call-routing service is used.
The system will detect and make use of this file if it is placed in the directory pointed to by your Profile: logical. This file should be in standard ASCII text file format.
The faxing software interprets fax numbers as follows:
-
All phone numbers entered as 7 digits (eg. 826-9675) are always dialed as local calls.
-
Phone numbers entered as 10 digits (eg. 604-826-9675) are dialed as long distance calls, ie., and the system adds a 1- to the beginning when dialing.
-
If the phone number entered is 10 digits, but its first 6 digits are listed in PREDIAL.DAT, then the area code will be replaced with whatever is defined in PREDIAL.DAT.
Here is a sample PREDIAL.DAT:
[Prefix]
604-820=
604-826=
604-556=
604-850=
604-852=
604-854=
604-855=
604-859=
604-864=
604-856=850-0000,,,,1234,,
604-857=850-0000,,,,1234,,
Where there is nothing on the right hand side of the "=" sign, the area code will be removed and the number will be dialed as a local number.
Where there is something on the right hand side of the "=" sign, the area code will be replaced with whatever is there (in the above example, a phone number starting with 604-856, like 604-856-0000, will be dialed as 850-0000,,,,1234,,856-0000). A comma in the prefix represents a 1 second pause.
A complete list of prefixes local to your calling area can be found in your telephone directory white pages.
PREDIAL.DAT can contain a total of 501 lines, including the header keyword "[Prefix]". Each area code - prefix entry must be on its own line. The dash between area code and prefix is optional. Blank lines between groups of entries are acceptable in order to provide better readability and organization when setting up the file.
F. TEMPORARY WORK FILES
For every fax sent online, the program generates a temporary file named in the format: %%%%%%.FAX%%%. System administrators should configure their Backup/Purge procedures to periodically delete these work files from the server.
Consult the OMTOOL™ documentation regarding the purging of OMTOOL™ - generated temporary files and activity logs.